Appendix C: Using the Printers table to handle control codes for printers
Control codes are a series of characters (usually one to five) that the printer recognizes as commands to perform certain functions. The most common is for cutting the paper at the end of a receipt, but they can also be used to change the color, font or style of text being printed. The control codes for printers are generally found in a programmer’s or developer’s manual, but some manufacturers include them in the user’s manual.
While it is possible to enter the control codes directly into a receipt or Credit Card Receipt layout, it is recommended to use the Printers table and make a generic layout. The Printers table allows the use of different brands and models of printers that share the layout. The Printers table also makes it simpler in the future if the printer for a salespoint is changed to a different brand or model.
The first step is to verify or add the printer’s control codes to the Printers table. Many printers’ control codes already exist in the Printers table. You can see all of the printers already in the Printers table from the Sales > Tools > Sales Pt Setup > Printing > Dot Matrix Printer dropdown.
Note: The label Dot Matrix Printer is retained from older versions of Salesware. Other types of printers are now supported by the Printers table as well.
If you need to add a printer, you can use SQL Server Management Studio. While this document shows entering the codes in the decimal format of their ASCII (American Standard Code for Information Interchange) value, they are displayed in Management Studio and Helper utility as the actual characters (see the ASCII character codes charts at the end of this appendix). Some of these are not “displayable,” so they show up as a square, while others display as “normal” characters. Here is an example of what may be displayed:
To find out what the characters are that aren’t displayed, they can be copied from Management Studio or Helper utility and pasted into TextPad (www.textpad.com). This application shows the decimal format of the ASCII character; for example:
Display this by moving the mouse cursor in front of the character that can’t be displayed.
If the necessary control codes or printer needs to be added, accesso Siriusware has developed a script to be run in Microsoft SQL Server Management Studio (SQL Server 2008 or 2012). Here is a sample script for a Star TSP600 printer:
DECLARE @P_Name VARCHAR(30),
@Reset VARCHAR(30),
@DoubleWide VARCHAR(30),
@DoubleHigh VARCHAR(30),
@Condensed VARCHAR(30),
@Bold VARCHAR(30),
@Italics VARCHAR(30),
@Underline VARCHAR(30),
@Pitch_10 VARCHAR(30),
@Pitch_12 VARCHAR(30),
@Pitch_15 VARCHAR(30),
@NLQ_Print VARCHAR(30),
@Color_1 VARCHAR(30),
@Color_2 VARCHAR(30),
@Color_3 VARCHAR(30),
@Color_4 VARCHAR(30),
@Landscape VARCHAR(30),
@Cut_Code VARCHAR(7)
SELECT @P_Name='STAR TSP600'
SELECT @Reset=CHAR(27)+CHAR(64)
SELECT @DoubleWide=CHAR(14)
SELECT @DoubleHigh=CHAR(27)+CHAR(14)
SELECT @Condensed=''
SELECT @Bold=CHAR(27)+CHAR(69)
SELECT @Italics=''
SELECT @Underline=CHAR(27)+CHAR(45)+CHAR(1)
SELECT @Pitch_10=''
SELECT @Pitch_12=CHAR(27)+CHAR(77)
SELECT @Pitch_15=CHAR(27)+CHAR(80)
SELECT @NLQ_Print=''
SELECT @Color_1=CHAR(27)+CHAR(53)
SELECT @Color_2=CHAR(27)+CHAR(52)
SELECT @Color_3=''
SELECT @Color_4=''
SELECT @Landscape=''
SELECT @Cut_Code=CHAR(27)+CHAR(100)+CHAR(3)
IF EXISTS (SELECT p_name FROM printers where p_name=@P_Name)
UPDATE printers SET
reset=@Reset,
doublewide=@Doublewide,
doublehigh=@DoubleHigh,
condensed=@Condensed,
bold=@Bold,
italics=@Italics,
underline=@Underline,
pitch_10=@Pitch_10,
pitch_12=@Pitch_12,
pitch_15=@Pitch_15,
nlq_print=@NLQ_Print,
color_1=@Color_1,
color_2=@Color_2,
color_3=@Color_3,
color_4=@Color_4,
landscape=@Landscape,
cut_code=@Cut_Code
WHERE p_name=@P_Name
ELSE
INSERT INTO printers
(p_name,
reset,
doublewide,
doublehigh,
condensed,
bold,
italics,
underline,
pitch_10,
pitch_12,
pitch_15,
nlq_print,
color_1,
color_2,
color_3,
color_4,
landscape,
cut_code)
VALUES
(@P_Name,
@Reset,
@Doublewide,
@DoubleHigh,
@Condensed,
@Bold,
@Italics,
@Underline,
@Pitch_10,
@Pitch_12,
@Pitch_15,
@NLQ_Print,
@Color_1,
@Color_2,
@Color_3,
@Color_4,
@Landscape,
@Cut_Code)
SELECT * FROM printers WHERE p_name=@P_Name
It is not necessary to understand this entire script, but a couple of things are noteworthy. First, this script adds the printer and codes for a printer that is not currently in the Printers table. However, if a printer with the same P_Name is listed in the Printers table, this script updates the codes for it. Also, the series of SELECT statements in the second section needs to be filled out with the control codes for the printer. As seen in this example, not all fields can be filled in because not all printers support all of the functions available. When necessary to leave a field blank, use two single quotes as shown in the example. When filling in a control code, the char() function is used so that characters that cannot be typed can be entered. Also note that the control characters are listed in decimal format. Most codes are supplied in the manual as the “code” and hexadecimal and sometimes decimal.
Using the manual, fill out the codes for all available options. Here is an example of how the manual shows a code:
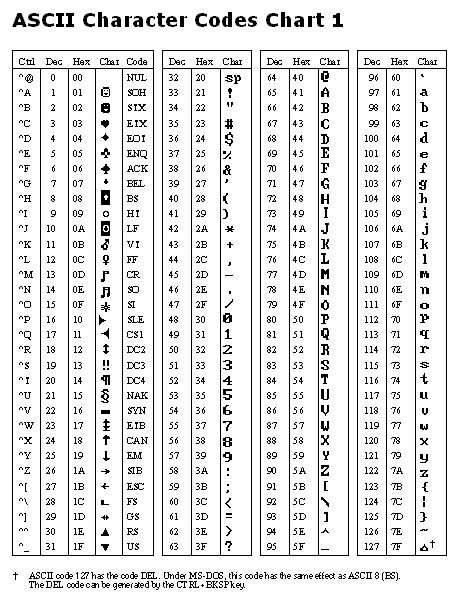
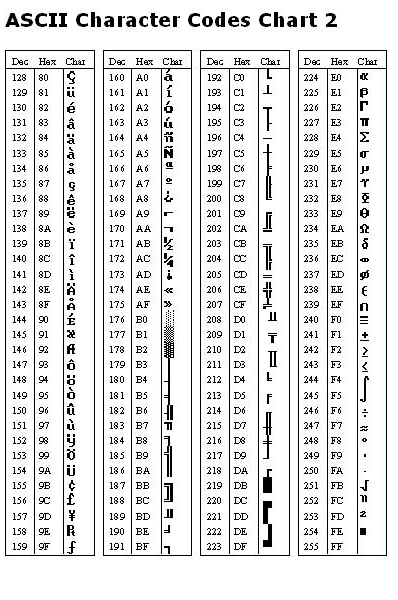
This is the information on selecting emphasized (bold) printing for the Star TSP600 printers. In order to add this entry to the script, it is necessary to convert the hexadecimal (HEX) number to decimal. This can be done with the ASCII charts at the end of this document. Using these charts, 1B becomes 27 and 45 becomes 69.
These are then added to the script as:
SELECT @Bold=CHAR(27)+CHAR(69)
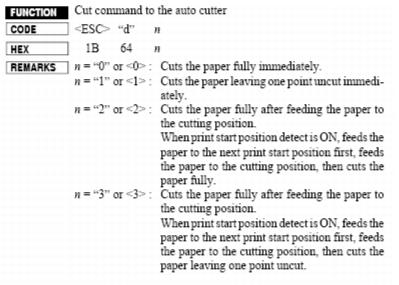
Some printer functions have variables that give an option for that function. For example:
With functions like this, it is necessary to choose what option is to be used, and then add that to the script. For example, if it is desired to have the paper partially cut without feeding paper first, this code would be used:
1B 64 01
Converted to decimal and added to the script, it appears as:
SELECT @Cut_Code=CHAR(27)+CHAR(100)+CHAR(1)
Once this script is completed, use Query Analyzer or Management Studio to run it on the SiriusSQL database. This adds (or updates, if the printer name is already in the Printers table) the controls for the printer.
After the Printers table has been updated, modify the layouts to use the new entries in the Printers table. For example, to add the cut_code function to a standard sales receipt, the following line would be added to the end of the layout:
<|printers->cut_code|>
This references the Printers table and the field named cut_code. To use another function, reference the field in the table, such as color_1, bold, underline, etc.
The final step (aside from testing) is at the salespoint. After making changes to the Printers table on the server, it is recommended to delete the local Printers table from the Sales\Data folder. This causes the table to be rebuilt from the server when Sales is launched. Launch Sales and log in. Go to Tools > Sales Pt Setup > Printing and select the Dot Matrix Printer from the list for the printer connected to the salespoint. Do this for all layouts that use this printer.
Now test. If the printer does not seem to respond to the control codes, verify that they are being sent to the printer. This can be done by changing the port for the printer driver to
FILE: and printing. See the documentation for the
PrintToFilePath .INI setting in the
Salesware .INI Settings Reference document for information on where the file prints. Open the file in Notepad and verify that the characters that were added to the
Printers table appear in the file. If not, this indicates an issue with Sales. It’s possible that the wrong
Dot Matrix Printer is selected in the
Printing setup. Verify that there is not more than one printer with the same name. It’s also possible that the modified layout was not updated at the salespoint. Finalizing a sale causes it to update. For more information on updating layouts, see
Appendix A: Packing and unpacking layouts.
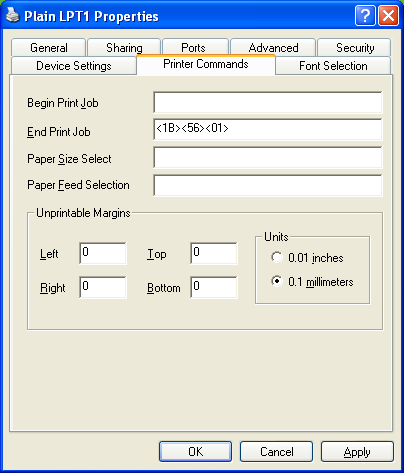
If the characters do appear in the text file, verify that they are correct by checking the programmer’s/developer’s/user’s manual. If they are correct, it’s possible to test them out within the printer driver. For example, to test the cut code for a Star TSP600 in the printer driver, open the printer driver properties and switch to the Printer Commands. Two fields here can be used for testing control codes: Begin Print Job and End Print Job. When testing font formatting changes, it is recommended to use the Begin Print Job field; for cut codes, use the End Print Job field.
Enter the control code in hexadecimal form. This can be pulled from the printer’s manual as before or converted from decimal using the ASCII chart at the end of this document.
In our example, the characters 27, 86 and 1 are converted to 1B, 56 and 01 and entered into the End Print Job field as shown:
Click Apply and it changes to:
<1B>V<01>
It is recommended to close the Properties window, reopen it and verify that the characters are still listed. Often Windows does not save these settings, so be certain they are there before continuing.
After verifying that the change was made, print a test page from the driver and the receipt is cut at the end.
Note: Character 0, the first character in the ASCII chart, is the NULL character. This character has a decimal form of 0. Some printers do use this character in the control codes for some functions. Unfortunately, this character does not pass through from Sales to the printer. With some functions, this can be corrected by using the actual 0 character (with decimal value of 48). For other functions, it may be possible to use the ASCII character with decimal value of 1 (SOH) or another character instead of 0.