Preparing Sales stations to be used in off-site sales
1. In SysManager, click on the Activities menu and select Pack Up All Layouts. Browse to the Layouts folder on the server (usually already selected) and click OK to continue. This ensures that the latest layouts on the server are copied to each salespoint.
Warning: This causes all salespoints to update their local Sales\Layouts directory; this update is not limited to just the salespoints that are used in off-site pass sales!
Alternative option: If it would cause a problem to have all salespoints update their local layouts, do not Pack Up All Layouts using the SysManager activity; instead, simply manually copy the Server layouts directory to the local Sales\Layouts directory for the salespoints that are used during the off-site pass sale.
Note: This step is only necessary if passes are printed off-line. If passes are not printed off-line, there is no need to update your local layouts directory in Sales.
2. Also, if assigning swipe numbers off-site for use in programs such as In-House Cards, you need to add/update the AssignNoQty=x setting in order to make sure that enough server assign_no table numbers are stored locally for the duration of the off-site sale. See the Salesware In-House Cards document for more information.
3. If you are not printing passes off-line, you can insert an .INI setting in the [Preferences] section that completely turns off pass printing at finalize. With this setting in place, the operator is never prompted to select a pass printer upon finalization of a pass sale. The setting is: PrintPassOnFinalize=FALSE.
4. Browse to the Sales32c.INI files of the salespoints that are used for the off-site pass sale and update the [Server] section to include the following settings:
StartupSalesEZ=FALSE
StartupBookEZ=FALSE (if you have the Private Instruction and/or Activity/Facility Scheduling modules)
StartupRentEZ=FALSE (if you have the Rentals module)
If you use ProtoBase, verify that you have the following settings:
CreditCardSales=TRUE
StartupCCEZ=FALSE
5. A critical step in off-site pass sales is the ability to look up existing guest records while off-site in order to prevent the creation of hundreds (thousands??) of duplicate guest records. To accomplish this, a copy of your server’s Guest and gst_pass tables must be loaded onto your off-site computer’s local data.
It is possible to create local Guests, gst_pass and associated Address table update files and manually unzip these files to the local Sales Data folder. This can be very helpful when dealing with large tables.
To use this alternative option:
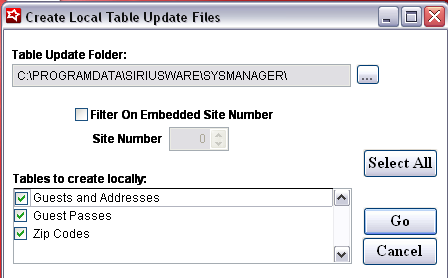
• Go to the SysManager > Utilities menu and select Data Maintenance.
• Select Create Local Table Update Files.
• Select Guests and Addresses, Guest Passes and Zipcodes
• If sharing a guest and guest pass database between multiple sites (with replication) you may also filter the list of records to just those records created at the current site.
• You may also specify the directory where the local update files are saved.
• Once the proper options have been selected, click Go.
A set of .zip files is created in the directory specified for each local table update file selected. These files are named with the appropriate table name plus the date and time of the local .dbf file creation.
To update the salespoints to be used in off-site sales, unzip the local table update files into the Sales Data directories of the salespoints that are used during the off-site sale.
Warning: If this faster zip file alternative is used, the following .INI changes must be made after the salespoint has been disconnected from SalesEZ application:
[Preferences]
GuestUpdate=TRUE
PassUpdate=TRUE
Again, do not change the .INI settings to TRUE until after the salespoint has been disconnected from SalesEZ application. If you change the .INI settings while Sales is still connected to SalesEZ application, the salespoint attempts to manually update the Guests and/or Guest Pass tables.
Note: That if any of the local tables exceed two gigabytes, the local update table creation process fails due to the limitation of a maximum size of two gigabytes per table.
6. After completing major updates to a salespoint, it is always a good idea to reset max keys. Do this in Sales by selecting Tools > Diagnostics > Reset Max Keys. If you used the zip files to update in step five, it is also a good idea to re-index your local data. Do this in Sales by selecting Tools > Data Files > Re-Index all local files.
7. Set up assume approvals for credit card sales high enough to accommodate the pass purchase amount (Tools > Credit Cards > General Setup). When you are offline, you are not receiving credit card approvals. You do not receive them until you are reconnected to the network.
Note: If using ProtoBase, an error occurs on the initial offline credit card transaction, “Error in Communication, ProtoBase is offline.” Click OK to this error. Subsequent transactions process error-free.
8. Set up pass printers locally if you are planning on printing passes off-site.
9. Modify any licenses if necessary. (A license is required in order to take guest photos or print passes out of Sales.)
10. TEST – TEST – TEST!!! Start Sales off-line and test selling a pass, capturing a photo and printing a pass in a standalone mode. Try multiple passes on a single line item and different types of passes.