Installation steps
Create a Kiosk salespoint and operator
1. Create a new salespoint by going to SysManager > System Lists > Salespoints
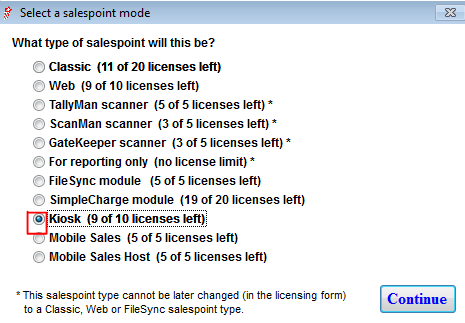
2. Click on New > select Kiosk > click on Continue
3. Enter a Salespoint Nickname and Description.
4. Configure the following tabs:
• Printing: Select the appropriate Receipt layout and select Email Only if you would like to send a receipt by email at the kiosk
• SP Type: As needed for your organization
• Credit Cards: Enter the appropriate information for your credit card setup
• Item Tree: Select the Kiosk Item Tree to be used and click on Done
5. Create an operator by going to SysManager > System Lists > Operators
6. Click on New and enter an Operator Login (e.g., “KIOSK”) and a full name
7. In Security Roles, select a role that has salespoint access and functions
8. In Security/Login create an initial password
9. Click Save
10. Log out of SysManager and log back in with the user and password created for the Kiosk
Install the Kiosk salespoint
1. Install Common Files application, and then run the Sales Installer
• Custom Setup: You may choose to install Kiosk Training by selecting the red X and selecting This feature will be installed on local hard drive
• Salespoint Mode: Select the Kiosk option
• Interface Scaling: Leave as default (Kiosk uses onscreen keyboards automatically as needed)
• IP Addresses: Configure IP addresses as needed
• Initial Configuration Information: Leave settings as default
• Credit Card Processing: Select the appropriate processor
Configure the salespoint
1. Paste the HTML Kiosk Skin Pack provided by accesso into: C:\Program Files\Siriusware\Sales.
Note: Ensure that the folder that you are copying is NOT kiosk_html as this folder gets overwritten when Sales version updates occur.
2. Start Sales and select Yes to update local tables.
3. Once Sales has started and you have reached the log-in screen, select Cancel to close Sales.
4. Open the Sales32.INI file by going to Start > Siriusware > Settings > Sales32c.ini.
5. Ensure the following settings are in the [Kiosk] Section:
32 Bit Computers
[Kiosk]
Mode=file:///C:\Program Files\Siriusware\Sales\kiosk_html_Client_Name\ClassicKiosk.html
64 Bit Computers
[Kiosk]
Mode=file:///C:\Program Files(x86)\Siriusware\Sales\kiosk_html_Client_Name\ClassicKiosk.html
Note: The filename bolded above is the folder name of your skin pack.
6. Set up a password to exit the kiosk interface by adding the following [Kiosk] Setting. If you do not have a physical keyboard at the kiosk the setting could be blank.
[Kiosk]
Pass=Sirius
7. Set up auto log-in for the Kiosk so Sales logs in and starts up automatically without requiring a username and password. Use the Kiosk user and password as the set up in the Create a Kiosk Salespoint and Operator section.
[AutoLogin]
Login=kiosk
Pass=kiosk123
8. Start up Sales, it should automatically log-in and your specific client skin pack is now displayed.
9. Attach a physical keyboard to the computer and Press F8.
10. On the Tools dialog, click on Sales Pt Setup > printing, and then configure your ticket and receipt printers as needed.
Note: While the Kiosk is running, you can enter the Tools menu by hitting F8 on a keyboard at any time.