E-Commerce page flow
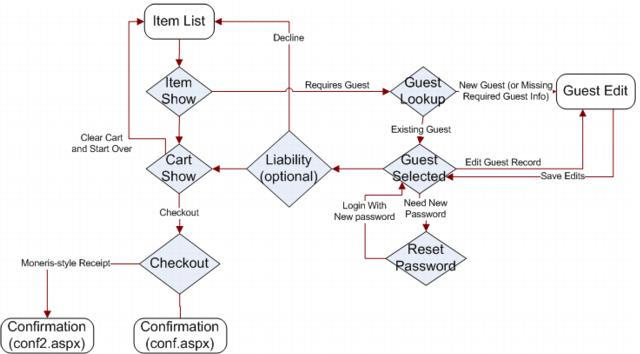
The following diagram illustrates Salesware’s E-Commerce web pages page flow.
Note: There is also a multi-page checkout option – see Using multiple pages to display and handle the E-Commerce checkout process for details.
E-Commerce web pages page flow begins with the ItemList.aspx page. From there it flows to the ItemShow.aspx page. Depending on how the software is configured and what item was selected in order to move to the ItemShow.aspx page, the next page to display is one of the following: Liability.aspx, CartShow.aspx or GuestLookup.aspx.
From the Liability.aspx page the flow goes to either CartShow.aspx or GuestLookup.aspx.
The visitor/guest lookup process presents a number of alternative ways to proceed, again depending on how the software is configured. The possible directions for the flow to go are through GuestEdit.aspx or GuestSelected.aspx. From the GuestSelected.aspx page, the flow can move to one of the following: ResetPswd.aspx, GuestEdit.aspx or CartShow.aspx. From ResetPswd.aspx the flow moves back to GuestSelected.aspx and the logical flow after that is to move to GuestEdit.aspx, and then CartShow.aspx. In the guest lookup process, once someone gets to the GuestEdit.aspx page and he saves his changes, he is taken to the GuestSelected.aspx page where he can continue on to the CartShow.aspx page.
Once someone gets to the CartShow.aspx page through the process described above, he has the option to clear the cart and start over (ItemList.aspx), continue shopping (ItemList.aspx) or proceed to checkout (Checkout.aspx).
Other options exist from each of the pages via direct links located in the header portion of the page. One can do a guest lookup (GuestLookup.aspx), a pass renewal (RenewPass.aspx) or an In-House Cards card lookup (DWLookup.aspx). If a pass renewal is done, then, depending on the configuration, the flow goes either to ItemShow.aspx or ItemList.aspx. If one does an In-House Cards card lookup, then this can lead to either the GuestSelected.aspx page, the GuestEdit.aspx page or the CartShow.aspx page. One can also get to the ItemList.aspx page or the CartShow.aspx page from the direct links in the header.
After the Checkout.aspx page, either the conf.aspx or conf2.aspx page displays (this is another configuration choice).
Other pages which could come into play are: cvv.aspx, error.aspx and gettix.aspx. The cvv.aspx page is basically an image that can be displayed on the checkout page. The error.aspx page displays under certain error conditions. And the GetTix.aspx page is only involved when selling Print At Home Tickets items.