Updating instructions
6. Download the following files from the Information Portal:
• ECommerce_Pages_4201_xxx.exe
• ECommerce_Pages_Config_xxx.exe
7. Create a new folder under C:/inetpub/wwwroot or wherever you keep you web source files
Note: A new folder allows you to work on the updates to your web site, while keeping your original E-Commerce module working via your published links.
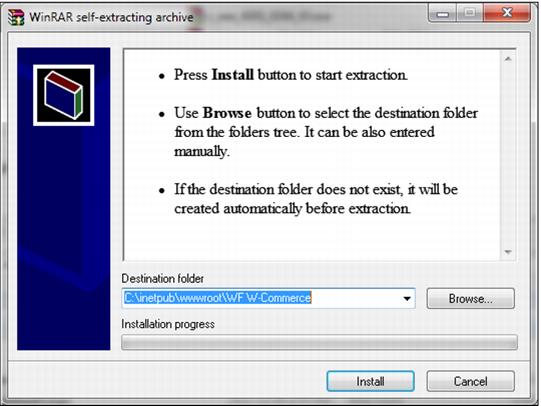
8. Extract both downloads into this folder by clicking on the Install button.
9. Copy all files from the DefaultConfig folder, and then paste them into the root folder you created for the new site.
10. Rename the web.config.default to web.config
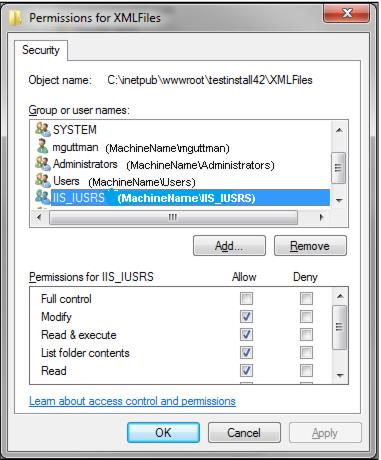
11. Ensure the \IIS_IUSRS user has Modify permissions assigned to the following files/folders:
• Images folder
• XMLfiles folder
• SiteConfig.config
a. Right click on the file or folder and go to Properties > Security tab
b. If the Modify Permission is not enabled for the IIS_IUSRS user:
1. Highlight the user and hit the Edit button.
2. Highlight the user and choose to allow Modify under Permissions
3. Hit Apply, and then OK
4. Hit OK to close the dialog box
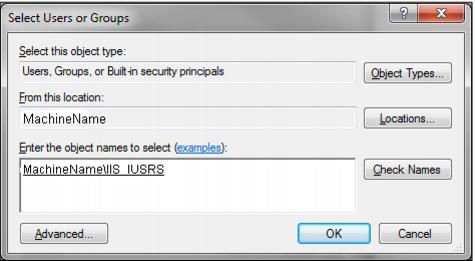
c. If the IIS_IUSRS user is not present under Group or Usernames:
1. Click the Edit button on the Security tab.
2. On the next window click the Add button.
3. The From this location setting is set to the computer name. If it is not:
• Click the Locations button.
• Select the computer name from the list of locations and click OK.
4. Enter IIS_IUSRS into the Enter the object names to select text box and click the Check Names button.
5. The entry in the Enter the object names to select text box appears as MACHINENAME\IIS_IUSRS.
6. Click OK to close the dialog box.
7. With the IIS_IUSRS user highlighted choose to Allow Modify under Permissions.
8. Click OK to close the dialog box.
12. Also, ensure that the ReadOnly check box is unchecked on the General tab for the files and folders mentioned above.
Note: This seems to be often overwritten and leads to an error trying to save changes from the Admin Panel.
13. If you are using wwService to connect to the ww.dll, make the following changes. (The SiteConfig.config file is set up for a local connection to the ww.dll by default)
a. Open the SiteConfig.config file in the text editor of your choice
b. Find the Key localhost.wwSalesSvc and replace 000.000.000.000 in the Value with the IP Address of your wwService.
c. Find the Key UseWebService and change the Value to 1.
d. Find the Key EncryptSvcComm and set the Value to either 1 or 0 depending on how your wwService is set up.
e. Your site is now able to connect and you can make additional modifications to settings via the Admin Panel.
14. Make the following changes in Internet Information Services (IIS) Manager.
a. Under the MachineName drill down into Sites > Default Web Site.
b. Locate the folder you created in Step 2 above, right-click on it and select Convert to Application
c. On the Add Application dialog click the Select button and select the appropriate Application Pool which must be configured as follows:
• Use the .NET Framework v4.0.30319
• Use Integrated managed pipeline mode
• Enable 32-Bit Applications must be set to True
d. Click OK to close the Add Application dialog