Installing wwService on Windows Server 2008/2012
The wwService gets installed on the same computer as ww.dll. The wwService supports encryption. See the Salesware E-Commerce User Guide for more information.
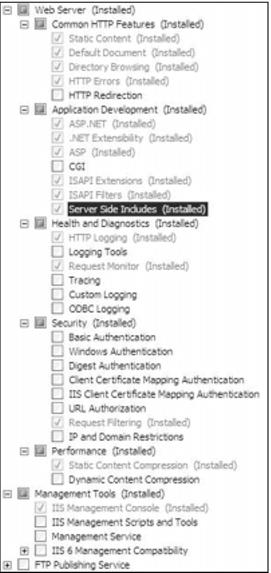
Note: In Windows Server 2008, you must create a Server Manager role. When creating the Server Manager role in the Server Manager, ensure that the following radio buttons are selected:
Note: When setting up in IIS for Windows Server 2008 64-bit platforms, you have to go into the application pool’s Advanced Settings and set Enable 32-bit to True. Without this setting in place, wwService won’t run. This setting is not visible at all in IIS on 32-bit Windows Server 2008 platforms.
To install wwService on Windows Server 2008/2012:
1. Go to Start > Administrative Tools > Server Manager and expand Roles by clicking on the +.
2. Expand Web Server (IIS) by clicking on the +.
3. Click on Internet Information Services (IIS) Manager, and then drill down to the Default Web Site, as shown in the following screen capture:
4. Expand the folder Default Web Site, and then right-click on it (Default Web Site).
5. Select Add Virtual Directory and the Virtual Directory dialog is displayed.
6. Enter wwService as your Virtual Directory Alias:.
7. Select the physical path by clicking the ... button and browsing to C:\inetpub\wwwroot\ and highlighting it.
8. Click the Make New Folder button and name the new folder wwService. Click OK.
9. From the Add Virtual Directory dialog, click Connect as... .
10. From the Connect As dialog, ensure that the Application user (pass-through authentication) radio button is selected. Click OK.
11. From the Add Virtual dialog, click OK.
12. Copy the wwService_xxxx.exe file to your new wwService folder.
13. Double-click on the file to unzip it.
14. Right-click on the wwService folder and select Convert to Application.
15. In IIS Manager, click on the wwService folder so that the E-Commerce module features display as icons (Features View) and ensure that the Group by: dropdown shows Area.
16. In the IIS area, right-click on the Authentication icon and select Basic Settings... .
17. On the Edit Application dialog, click the Select... button and select the DefaultAppPool from the Application pool: dropdown.
18. Click OK, and then Click OK again.
19. Click on Application Pools and select or create an application pool. Be sure that this web service is being put into an application pool that is not running any other application. On the Edit Application Pool dialog, ensure that .NET Framework v4.030319 is selected from the .NET Framework version: dropdown and that Integrated is selected from the Managed pipeline mode: dropdown. Click OK.
20. Open the web.config file located in the wwService folder and in the <appSettings> section, which is towards the top, set the value of EncryptSvcComm to 0.
22. Click rInvoke and enter getserverinfo into the strFunc: box.
23. Click the Invoke button and you get returned something that looks like this in a separate window:
<?xml version="1.0" encoding="utf-8" ?>
<anyType xmlns:q1="http://www.w3.org/2001/XMLSchema" d1p1:type="q1:string" xmlns:d1p1="http://www.w3.org/2001/XMLSchema-instance" xmlns="http://tempuri.org/wwService/wwSales">OK :<path>C:\Program Files\Siriusware\E-Commerce\</path><filename>ww.dll</filename><version>4.000r</version></anyType>
24. This is the equivalent of running the first vbs script, ww1.vbs.
25. Be sure to set the value of EncryptSvcComm to 1 in the web.config file in wwService and in E-Commerce module when you are ready to enable encryption.