Group (account) functionality setup
E-Commerce module includes Group (account) functionality that allows access to a specified menu of items. Being part of a group literally means that the guest has access to the appropriate log-in and password necessary to gain access to the special menu (the guest is not actually linked to an account within the data). All completed web sales done while logged into the group are recorded within an account configured for the group in SysManager. Groups may charge their purchases to the account or they may be forced to pay for their purchases in full with a valid credit card based on the account’s configuration.
To set up group (account) functionality, start in SysManager by configuring an account (SysManager > Activities > Accounts > New) for each group that needs access to their own menus (the same group of items – or menu – may be used for multiple groups).
1. Create a Nickname for the account. This is limited to ten characters.
2. If credit is extended to the group, specify the credit limit for the account/group.
3. Enter any other necessary information (address info, account type, etc.).
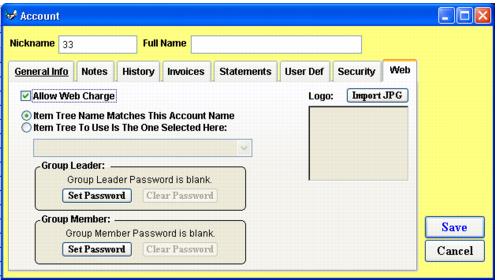
4. On the Web tab, check the check box labeled Allow Web Charge if you want to allow the group to post E-Commerce sale charges to their account. See screen capture. With the box unchecked, purchases made while logged into the account/group require the use of a credit card for the full purchase amount.
5. Select the appropriate radio button based on how the item tree is named for this account/group. Select the first option (Item Tree Name Matches This Account Name) when the item tree folder you want assigned to this group matches the account’s nickname. Select the second option (Item Tree To Use Is The One Selected Here) to activate the dropdown list displaying all item tree folders and subfolders where the item tree folder that you want to assign to the group can be selected.
6. Enter only the group member password (the group leader password is used only for Club Management functionality – see
Club Management).
After the account is configured, configure the following settings in your site config file:
• Site Admin Panel > Group/Accounts and Club Management Settings > EnableActCharge value = 1
• Site Admin Panel > Group/Accounts and Club Management Settings > InheritGroup value = 1
• Site Admin Panel > Group/Accounts and Club Management Settings > cbActChgTxt value = Charge to the {{grpName}} account