Club Management SysManager configuration
Start in SysManager by configuring an account for each group that needs access to its own menu or item tree when shopping online (the same group of items – or menu – may be used for multiple groups).
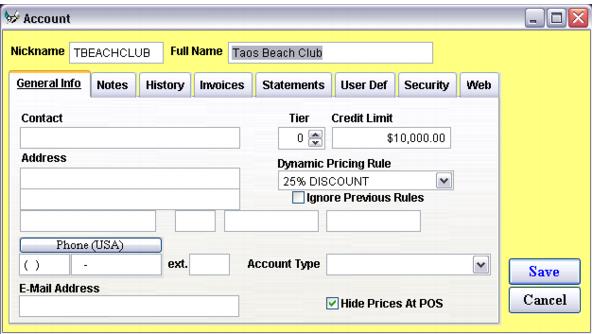
1. Create a Nickname for the account. This is limited to ten characters (see following figure).
2. Enter the Full Name of the account/group.
3. If credit is extended to the group, specify the Credit Limit for the account/group.
4. Assign a Dynamic Pricing Rule to the account/group if items that are common to multiple groups or even those available to the general public are to be priced specifically for that group.
5. Optional – if this account is only used for web transactions, it is a good idea to hide it from the regular salespoints by checking the Hide Prices At POS check box.
6. Enter any other necessary information (address information, account type, etc.).
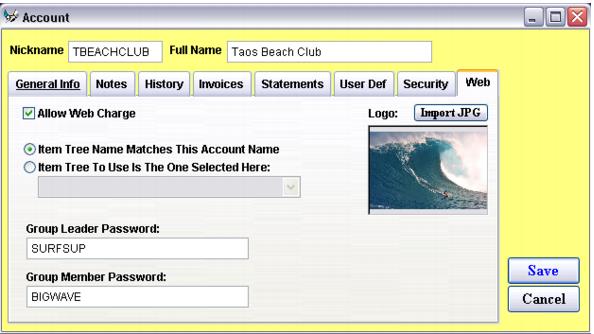
7. On the Web tab (see following figure) check the check box labeled Allow Web Charge if you want to allow the group to post E-Commerce sale charges to their account. With the box unchecked, purchases made while logged into the account/group require the use of a credit card for the full purchase amount.
8. Select the appropriate radio button based on how you configure the item tree for this account/group. Select the first option when the item tree folder you want assigned to this group matches the account’s Nickname. Select the second option to activate the dropdown list displaying all item tree folders and sub-folders where the item tree folder that you want to assign to the group can be selected.
9. Enter the group leader and group member passwords.
10. If you have a group/club logo or photo that you want displayed on the main club page, click on the Import JPG button and browse to and select the JPEG image.