Folio Charge : Installation and use of the Folio Charge module Installation and use of the Folio Charge module
The Folio Charge installer:
• Names the Folio Charge installation directories FolioCharge rather than PMS in both Program Files and ProgramData
• Produces default .INI files with comments written into them correctly so they don't interfere with
parameters
There are four steps required to install and use the Folio Charge module:
1. Install and configure Folio Charge on the interface PC.
2. Configure the Folio Charge payment type(s).
3. Configure Sales.
4. Test.
These steps are detailed in the following sections.
To install and configure Folio Charge module on the interface PC:
1. Ensure that the PC used for the interface PC meets the specifications set forth in the
Salesware System Architecture and Specifications document, available from
http://www.siriusware.com/docs.
2. Configure the interface PC with a static IP address.
3. Run the Common Files application installer (Install Siriusware Common Files.msi) on the interface PC.
4. Save the latest Folio Charge update file (c_pms_xxxx.exe) in the Siriusware\Updates folder on your SQL Server.
5. Run the Folio Charge installer (Install Sirusware Folio Charge.msi) on the interface PC. With the installer, you are prompted for the Serial Port number for the COM .INI setting in the PMSServer.INI file (installed on the local hard drive in Program Files\Siriusware\FolioCharge). If you don’t know this number, select the default (1) and change the setting in PMSServer.INI later. You are also presented with the following dialog, which summarizes further installation steps (covered in greater detail in this document).
6. Manually remove the extra slash from the local path written in runexe_system.INI
ProgramDataPath=C:\ProgramData\Siriusware\FolioCharge\
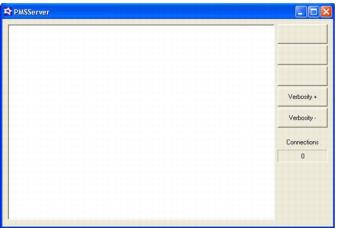
7. Start the Folio Charge module. It looks like this:
Note: By default, the Folio Charge module is configured by the Folio Charge installer to automatically start when you log-in to the Folio Charge server.
8. Edit the PMSServer.INI file as necessary. You may need to modify the Formatting .INI setting. The following shows the settings for a sample PMSServer.INI file.
Note: The SMS system is set up to communicate at 9600 baud, 8, N, 1 so you don’t need to make any changes to the comm port settings.
[Preferences]
VerbosityLevel=3 ;level of detail to show on-screen and in log file
MaxQueue=1 ;how many active connections supported (always set to 1)
Formatting=0 ;0 means micros, 1 means straight XML
FakeMode=FALSE ;system can run in emulation for testing on POS side.
[SerialPort] ;settings for comm port connected to PMS server
COM=1
BaudRate=9600
Parity=N ;O for Odd, N for None, E for Even
DataBits=8
StopBits=1
[TcpIP]
ListenPort=10005 ;port to listen on
[TimeOut]
MainTimeOut=10000 ;defaults to 10000 (10 seconds) amount of time before it will
;give up on a pms response
[Post]
PaymentNumber=0 ;to be sent to PMS System for payment number
9. Once the Folio Charge interface is running, you can verify the connection to the COM port by viewing the on-screen log.
To configure the Folio Charge payment type:
1. Go to SysManager > Activities > Financial Lists > Payment Types.
2. Create new payment type and give it a Description (Room Charge or whatever is appropriate).
3. In the Process Via dropdown, choose the Folio Charge option.
To configure Sales:
Add the following settings to the Sales32c.INI file. For further descriptions of these settings, see the Salesware .INI Settings Reference document.
[PMS]
Port=10005 ;port that the PMS server is listening on
IP=000.000.000.000 ;static IP address of the Folio Charge interface PC
SalesPointCode=020 ;specific code to be passed to Folio Charge interface PC
;server by salespoint - set to store/rev center
PrintCCReceipt=TRUE ;setting to force printing of a cc receipt with
;signature line if there was a PMS charge on the sale
PrintReceipt=FALSE ;setting to not force receipt printing
AllowManualApproval=FALSE ;do not allow approval codes to be manually entered when
;the Folio Charge interface PC is disconnected
[Preferences]
ChargeDrawerPop=FALSE ;the cash drawer does not pop when only credit cards or
;Folio Charge module charges are used to pay
To test:
1. Verify that the salespoint connects to Folio Charge interface PC by viewing the console on Folio Charge interface PC.
2. Verify Folio Charge payment type is available on the Finalize/Save/Pay dialogs in Sales.
3. Select the Folio Charge payment type for a sale and verify that the operator is prompted to do a room number lookup.
4. Verify the charges in the Folio Charge itself.
Note: The following setting populates the .INI after running the Update_Siriusware_43.msi installer. If you receive errors make sure that the following settings are present in the .INI:
[Server]
POSDescripForAccount=TRUE
FullID=TRUE
InquireResponseLength=60
SubmitAuxInfo=TRUE
GetConf=TRUE