Set up export to Kronos
Instructor Payroll module users export the data from Instructor Payroll to Kronos using a specific format determined either by Kronos’ standard payroll interface or a custom payroll interface created by Kronos for your resort. You need to familiarize yourself with the specific format required by your Kronos system for exporting payroll information from the Instructor Payroll module to Kronos. This specific information is entered in PayManager > Settings > Export Preferences.
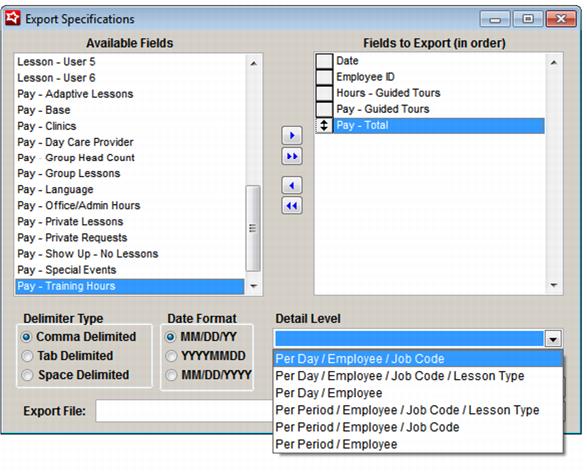
To set up your export parameters for Kronos:
1. Go to PayManager > Settings > Export Preferences.
2. Select the Available Fields that are required by your Kronos interface and move them to the Fields to Export (in order) box to the right using the arrow keys.
Available Fields |
Date |
Employee ID |
End Time |
Hours – Adaptive Lessons |
Hours – Clinics |
Hours – Day Care Provider |
Hours – Goup Head Count |
Hours – Group Lessons |
Hours – Guided Tours |
Hours – Language |
Hours – Office/Admin Hours |
Hours – Private Lessons |
Hours – Private Requests |
Hours – Sales Incentive |
Hours – Show Up – No Lessons |
Hours – Special Events |
Hours – Total |
Hours – Training Hours |
Instr Dept |
Job Code |
Lesson – User 1 |
Lesson – User 2 |
Lesson – User 3 |
Lesson – User 4 |
Lesson – User 5 |
Lesson – User 6 |
Pay – Adaptive Lessons |
Pay – Base |
Pay – Clinics |
Pay – Day Care Provider |
Pay – Group Head Count |
Pay – Group Lessons |
Pay – Guided Tours |
Pay – Language |
Pay – Office/Admin Hours |
Pay – Private Lessons |
Pay – Private Requests |
Pay – Sales Incentives |
Pay – Show Up – No Lessons |
Pay – Special Events |
Pay – Total |
Pay – Training Hours |
Social Security Number |
Start Time |
3. Once all required fields are in the Fields to Export (in order) box, drag and drop the fields until they are in the exact order needed by the Kronos interface.
4. Select which Delimiter Type for the export file: Comma Delimited, Tab Delimited or Space Delimited.
Note: Most interfaces require the Comma Delimited format.
5. Select which Date Format is required by your Kronos interface: MM/DD/YY or YYYYMMDD.
6. Select the Detail Level required by your Kronos interface. The Detail Level setting has six options that are selected from a dropdown list. The choices are described below:
a. Per Day/Employee/Job Code
• This produces one line on the export per Day, Employee and Job Code.
b. Per Day/Employee/Job Code/Lesson Type
• This produces one line on the export per Day and Employee and Lesson Type
c. Per Day/Employee
• This produces one line on the export for each Day and Employee (all pay summarized per day per employee).
d. Per Period/Employee/Job Code/Lesson Type
• This produces one line on the export per Pay Period, Employee and Lesson Type.
e. Per Period /Employee /Job Code
• This produces one line on the export per Pay Period, Employee and Job Code.
f. Per Period/Employee
• This produces one line on the export per Pay Period and Employee (all pay summarized for all days included in the pay period per employee)
7. Specify the location and name of the Export File. Click the … to browse to the correct folder, and enter an output filename.
Note: The filename is whatever name your Kronos interface expects.
8. Save your changes.