Receipts, Invoices, Summaries, Charge Cards, saved Sales, Remote Receipts and Z-Tape Reports
Receipt layouts are either short or long. Short layouts print to a forty column printer. Long layouts print to standard 8.5” x 11” paper.
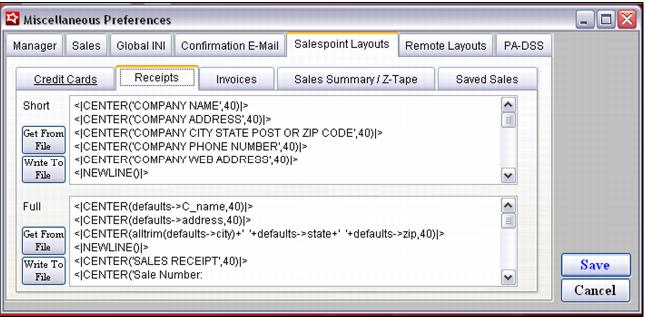
Text Merge layouts are associated with their applications for receipts, invoices, summaries, credit cards, saved sales, remote receipts and Z-Tape Reports from SysManager > Preferences > Miscellaneous > Salespoint Layouts tab, as shown in the following screen capture:
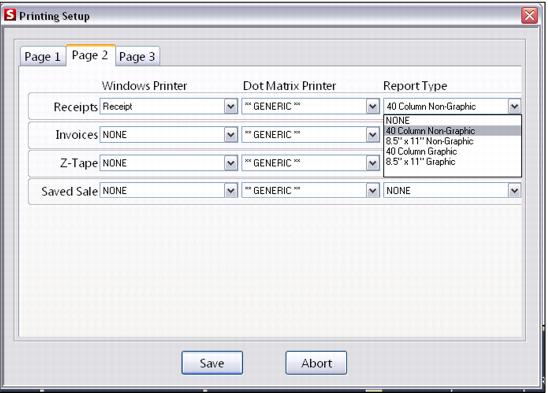
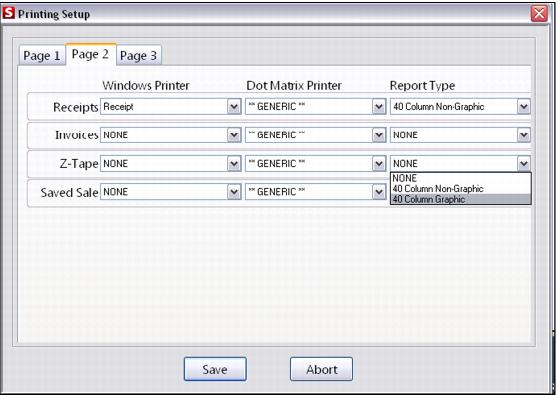
Graphic layouts and Text Merge layouts are associated with their applications for receipts, invoices, Z-Tape Reports and saved sales from Sales > Tools > Sales Pt Setup > Printing (Printing Setup) > Page 2 tab, as showing in the following four screen captures:
The SysManager > Preferences > Miscellaneous dialog (see screen capture, above, at the beginning of this section) is also used for kitchen printing. Kitchen printing refers to the sending of information at save or finalize to a receipt printer. The Remote tabs allow up to eight various Remote Receipt layouts to be configured. Thus, based on what kitchen printer is being used, the layout can vary.
Example:
Remote printer #1 is used for the bar and remote printer #2 is used for the grill. Based on a bartender needing a different layout than a cook, the Remote Receipt layouts for #1 and #2 are customized. The remote printer that is used is associated with the DCI from SysManager:
SysManager >
DCIs icon >
Item Edit Form >
Printing tab >
Print Remote On check boxes. (See screen capture in the
Tickets and vouchers section, above.) The actual printer association for the remote configuration is made from
Sales >
Tools >
Sales Pt Setup >
Printing (
Printing Setup) >
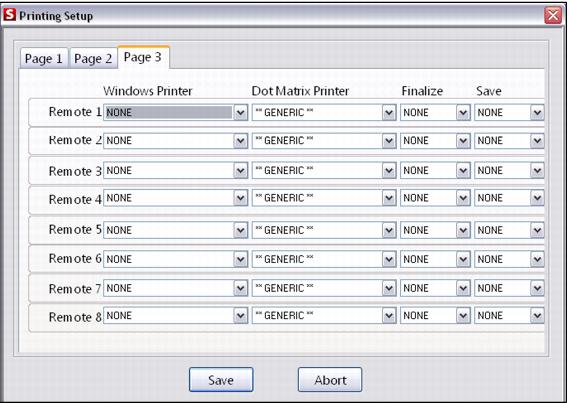
Page 3 tab, as showing in the following screen capture:
You can also override any layout specified on SysManager > Preferences > Miscellaneous. This allows you to fully customize any salespoint. This functionality is useful if you want to customize a single salespoint using a layout different from any of the resort-wide layout choices.
You have the option of overriding the resort-wide credit card, invoice, receipt and all eight remote layouts.
To implement this functionality, create a set of custom layouts and store them in a folder locally. Then, in the Sales32c.INI file, specify the path to the new layouts folder:
1. In the [Data] section of the .INI file, the setting is LayoutPath=
• Default is usually LayoutPath=C:\ProgramFiles\Siriusware\Sales\Layouts\
2. In [Layouts] section of the Sales32c.INI file, specify layout type (see following table) and layout name:
Example:
Receipt=thermal40.txt
Note: The Sales32c.INI file is used to specify locally defined non-graphic layouts only. Use of local graphic layouts is determined by the Printez.INI file locally, using a method similar to that described above.
Additionally, you have the option to set up Group Level layouts, as defined by the groups listed under SysManager > Preferences > Misc> Global INI.
In order to take advantage of Group Level layouts, you must do the following:
1. Create appropriate Text layout for group level receipts (i.e., FBReceipt.txt, FBSavedSale.txt, FBCCTop.txt, etc.).
2. Create a new item under a miscellaneous DCI (**MISC** Receipts FBReceipt )
Note: This item is to act as a vessel to transport the layouts you created to the appropriate salespoints in the Group you add the layouts to.
• On the Printing tab of the item, select Shared Text Merge under Ticket 1 and click on the ellipses (…).
• Select the layout you created, FBReceipt.txt for example.
• Do the same for Ticket 2, Voucher 1 and Voucher 2 as needed.
• Save the item.
3. Edit the appropriate item tree with which salespoint group(s) are associated. Add the new receipt DCI to the item tree and inactivate the item.
4. Go to SysManager > Preferences > Misc > Global INI and locate the group under which to place the new layouts.
5. Under the [Layouts] section of that group, add the appropriate receipt name:
Receipt=FBReceipt.txt
SavedSale=FBSavedSale.txt
Note: Make sure to remove the semicolon ( ; ) from in front of the [Layouts] section and in front of the receipt type (i.e., Receipt=, SavedSale=). Only remove the semicolon in front of the receipt types you are using.
6. Restart Sales and test your new layout.
Layout type | Description |
CCBottom= | Salespoint specific non-Graphic layout for the bottom CC Receipt |
CCTop= | Salespoint specific non-Graphic layout for the top CC Receipt |
Invoice= | Salespoint specific non-Graphic layout for Invoices |
Receipt= | Salespoint specific non-Graphic layout for Receipts |
Remote1All= | Salespoint specific remote non-Graphic layout for remote layout #1 for ALL items |
Remote1New= | Salespoint specific remote non-Graphic layout for remote layout #1 for NEW items |
Remote2All= | Salespoint specific remote non-Graphic layout for remote layout #2 for ALL items |
Remote2New= | Salespoint specific remote non-Graphic layout for remote layout #2 for NEW items |
Remote3All= | Salespoint specific remote non-Graphic layout for remote layout #3 for ALL items |
Remote3New= | Salespoint specific remote non-Graphic layout for remote layout #3 for NEW items |
Remote4All= | Salespoint specific remote non-Graphic layout for remote layout #4 for ALL items |
Remote4New= | Salespoint specific remote non-Graphic layout for remote layout #4 for NEW items |
Remote5All= | Salespoint specific remote non-Graphic layout for remote layout #5 for ALL items |
Remote5New= | Salespoint specific remote non-Graphic layout for remote layout #5 for NEW items |
Remote6All= | Salespoint specific remote non-Graphic layout for remote layout #6 for ALL items |
Remote6New= | Salespoint specific remote non-Graphic layout for remote layout #6 for NEW items |
Remote7All= | Salespoint specific remote non-Graphic layout for remote layout #7 for ALL items |
Remote7New= | Salespoint specific remote non-Graphic layout for remote layout #7 for NEW items |
Remote8All= | Salespoint specific remote non-Graphic layout for remote layout #8 for ALL items |
Remote8New= | Salespoint specific remote non-Graphic layout for remote layout #8 for NEW items |