Web.config settings
In order for Self Entry to support pay-after-checkout the following needs added to web.config. In the <appsettings> section add the following (settings are approximate and may require changes for your setup):
<add key="DataFilePath" value="C:\ProgramDATA\Siriusware\SelfEntry\" />
Turns on Self Entry’s ability to write the necessary .se files.
<add key="CombineAddGuestSales" value="1"/>
When the CombineAddGuestSales is set to 1, all the guests added are merged into a single .se file.
Follow these instructions for the second configuration:
1. The key has to be the computer name (This is all caps)
2. The value has to be the printer name. Adding this to your config setting appends that information to the .se file.
<add key "<Name of your computer (all UPPERCASE)>" value ="<Printer name associated with the computer>" />
Example:
<add key="NOBODADDY10.SIRIUSWARE.COM" value="\\PHOENIX-REBORN\Cognitive Advantage 4 inch"/>
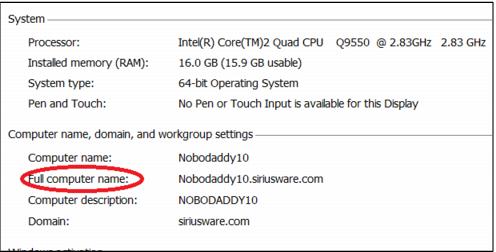
This designates the remote host and which printer, prints for that remote host. The key, for example, "NOBODADDY10.SIRIUSWARE.COM", from above, must be the full computer name of the remote host (computer connecting to host computer where SelfEntry is installed), all in capital letters, which can be found in Windows 7/Server 2008 if you go to Control Panel > System.
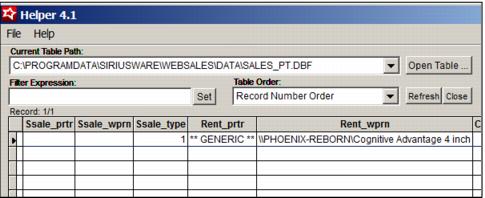
PHOENIX-REBORN\Cognitive Advantage 4 inch, from the above example, must be the exact name of the printer as it would appear in TOOLS > Sales Pt Setup > Printing in the Sales Host installed on the host computer where SelfEntry is installed. If the printer name is too long to be read as in the example below it can be found in readable form in sales_pt.dbf if you assign it temporarily. However, it is not necessary to assign a Rentals printer in Sales Host utility as the tag takes care of printing the contract.
If there are multiple remote hosts you just repeat the key as in the following example. Each of the remote host computers specified in the keys print to the printer specified for that remote host.
<add key="NOBODADDY10.SIRIUSWARE.COM" value="\\PHOENIX-REBORN\Cognitive Advantage 4 inch"/>
<add key="PHOENIX-REBORN.SIRIUSWARE.COM" value="Brother HL-5370DW"/>
<add key="NOBODADDY.SIRIUSWARE.COM" value="Dell 2330dn Laser Printer"/>
Self Entry Example
1. Customer either looks up self or creates new guest
2. In the GuestData2.aspx page the guest chooses the Equipment type for Pay After Checkout product
3. Proceed through Liability to Deposit information…
4. At Completion.aspx if Finish Transaction is chosen a .se file is generated containing a single guest. If Add Another Guest is chosen a .set file is generated which is appended for each additional guest that is entered before Finish Transaction is chosen. When Finish Transaction is finally chosen the .set file is converted to .se which Sales Host utility can then process. If the pages time out or error during the process an existing .set file is converted to a .se file
5. The .se and .set files are named with this convention:
Date_Time_Remote Host name_First Guest’s last name
20111103_090822_Nobodaddy10.siriusware.com_THE HUN_ATTILA.se or .set