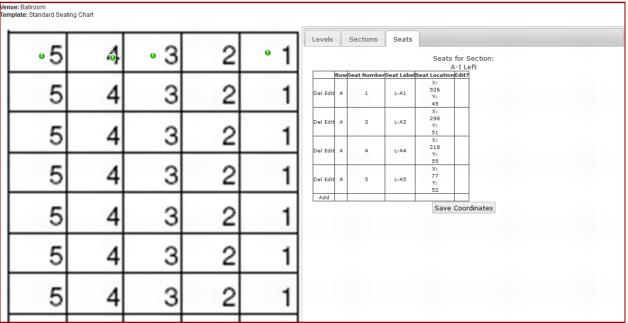
Seats
Add new
To map a Seat:
1. Click on the Add link by the grid. A new blank row is added to the grid and a new seat marker (yellow in this example) is added to the seat map.
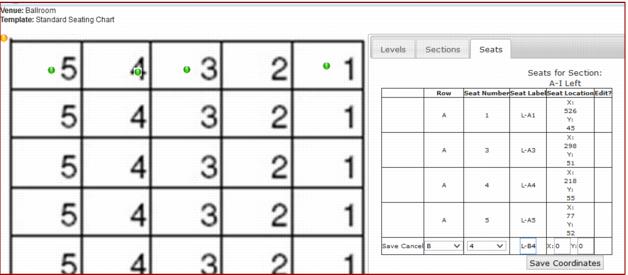
2. Select a Row and Seat Number from the dropdown boxes
3. Enter a Seat Label within the label box.
Note: Only Seats belonging to seat blocks already defined in SysManager can be mapped. Seat Number is the number as defined by the seat block. Seat Label is free text used to identify that seat in a more user friendly manner and is displayed in the tooltip when the mouse hovers over a seat indicator.
4. Click and drag the new seat marker to the desired location. Take note of how the X and Y coordinates in the grid row change dynamically.
5. Click Save to store the new seat location.
Edit existing
To edit an existing Seat:
1. Click on the Edit link next to the desired seat.
2. Select or enter new values for Row, Seat Number or Seat Label.
3. Drag the seat being edited to the desired location (Take note that the indicator has changed color).
4. Click Save to store the mapping.
Delete
To delete an existing Seat:
1. Click on the Delete link next to the desired Seat.
2. Confirm deletion on the alert box.
Reposition seats
It is possible to move or reposition mapped seats without the need to individually edit each one.
1. Click and drag the seat to be moved and reposition it as desired. Notice how the X and Y coordinates in the Seat Locations column of the grid change as the seat is moved. A * in the Edit? column of this grid indicates the seats that were repositioned.
2. When done repositioning, click on the Save Coordinates button to store the current seat locations.