Installing SQL Server 2008 or SQL Server 2012 on Windows Server 2008
In this install, IIS is not required. Use the Microsoft Web Platform Installer to install the prerequisites (frameworks and runtimes). Then, install SQL Server 2008 as described in the following:
To install SQL Server 2008/2012:
1. Insert the SQL Server 2008/2012 installation disk.
2. From the SQL Server Installation Center, click Installation.
3. From the Installation menu, select New SQL Server stand-alone installation or add features to an existing installation.
4. From the Setup Support Rules dialog, click OK. Setup begins.
5. From the Product Key dialog, select the Enter the product key: radio button and enter your unique product key. Click Next.
6. From the License Terms dialog, accept the license terms and click Next.
7. If this is a SQL Server 2012 installation, make sure Include SQL Server Product Updates is checked on the Product Updates dialog, and click next. If this is a SQL Server 2008 installation, skip to step 8.
Note: Please note that for SQL Server 2012 installation you will need to have .Net 3.5. For Siriusware software you will need .Net 4.0.
8. From the Setup Support Files dialog, click Install.
9. From the Setup Support Rules dialog, click Next.
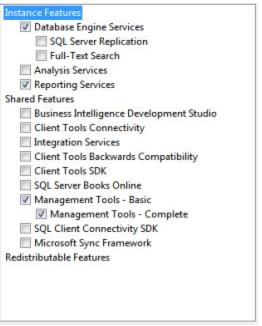
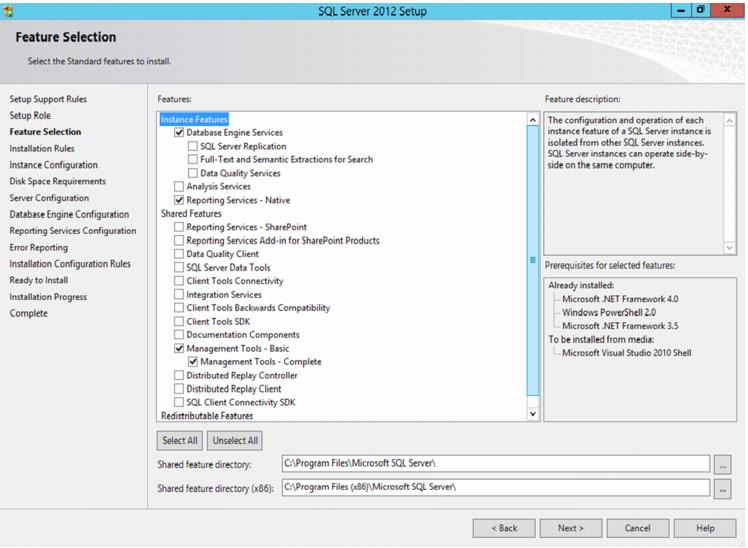
10. From the Feature Selection dialog, select Database Engine Services, Reporting Services, Reporting Services – Native (for SQL Server 2012 installations) and Management Tools - Complete (see screen capture). Click Next.
11. From the Instance Configuration dialog, select Default instance. Click Next.
12. Review the Disk Space Requirements. Click Next.
13. From the Server Configuration dialog, select NT AUTHORITY\SYSTEM from the Account Name dropdown for the SQL Server Agent, SQL Server Database Engine and SQL Server Reporting Services. Click Next.
Note: Some clients, particularly at larger sites, create a separate user with specific permissions and use that user in the previous step. You'll find it difficult to retroactively add this user after the installation, so check with your IT staff before proceeding if you think this might be an issue later.
14. From the Database Engine Configuration dialog, select the Mixed Mode (SQL Server authentication and Windows authentication) radio button, and provide a password for the built-in (SA) SQL Server system administrator account.
Note: It is important to assign a password for the security of your database. Don’t leave it blank! In fact, if you do leave it blank, you may have trouble logging into SQL Server from SQL Server Management Studio.
15. From the same dialog (Database Engine Configuration) add at least one SQL Server administrator (this is usually the administrator of the computer on which you are installing SQL Server 2008). Click Next.
16. On the Reporting Services Configuration dialog, select Install and configure for SQL Server 2012 installations or Install the native mode default configuration for SQL Server 2008 installations. Click Next.
17. On the Error Reporting dialog, decide what information (if any) you want to send to Microsoft. Click Next.
18. From the Installation Configuration Rule dialog, click Next.
19. From the Ready to Install dialog, click Install. Installation begins.
20. From the Installation Progress dialog, click Next after installation is successful.
21. From the Complete dialog, click Close.
To install SQL Server 2008 Service Pack 1:
1. Download SQLServer2008SP1-KB968369-x86(x64)-ENU.exe from the Microsoft web site to the desktop of the server computer.
2. Double-click on SQLServer2008SP1-KB968369-x86(x64)-ENU.exe.
3. At the Welcome dialog, click Next.
4. At the License Terms dialog, check I accept the license terms and click Next.
5. At the Select Features dialog, ensure that all options are checked and click Next.
6. At the Check Files In Use dialog, ensure that there are no services or applications running that might interfere with setup. Click Next.
7. At the Ready to Update dialog, click Update.
8. At the Update Progress dialog, click Next.
9. At the Complete dialog, click Close.
To install SQL Server 2012 Service Pack 1:
10. Download SQLServer2012SP1-KB2674319-x86(x64)-ENU.exe from the Microsoft web site to the desktop of the server computer.
11. Double-click on SQLServer2012SP1-KB2674319-x86(x64)-ENU.exe.
12. At the Welcome dialog, click Next.
13. At the License Terms dialog, check I accept the license terms and click Next.
14. At the Select Features dialog, ensure that all options are checked and click Next.
15. At the Check Files In Use dialog, ensure that there are no services or applications running that might interfere with setup. Click Next.
16. At the Ready to Update dialog, click Update.
17. At the Update Progress dialog, click Next.
18. At the Complete dialog, click Close.
To check what service pack you are running:
1. From Start > All Programs > Microsoft SQL Server 2008 > SQL Server Management Studio.
2. Type SELECT @@VERSION into the query window and select Execute.
3. You get results similar to the following:
Microsoft SQL Server 2008 (SP1) - 10.0.2531.0 (X64) Mar 29 2009 10:11:52 Copyright (c) 1988-2008 Microsoft Corporation Developer Edition (64-bit) on Windows NT 6.1 <X64> (Build 7600: )
Microsoft SQL Server 2012 (SP1) - 11.0.3000.0 (X64) Oct 19 2012 13:38:57 Copyright (c) Microsoft Corporation Standard Edition (64-bit) on Windows NT 6.2 <X64> (Build 9200: )
(SP1) is the service pack identification.
Note: The operating system is listed at the end of the (Windows NT 6.1 <X64>) − sometimes that has a service pack associated with the operating system. Do not confuse the OS service pack with the SQL Server service pack.