Running the Server Files installer
To install Server Files application:
1. On the desktop of the server computer, create a folder called SiriusTEMP.
Note: The actual name that you assign to the folder is arbitrary. But you do need to create a separate folder.
2. Copy the following files into the SiriusTEMP folder.
• Software installer files – installers are copied by the Server Files installer into \Siriusware\Install.
• The SiriusSQL database (if it is zipped, unzip the contents in this folder) – You install either an existing SiriusSQL database or a new, “clean” SiriusSQL database. The database consists of four files:
SiriusSQL.ldf,
SiriusSQL.mdf,
SiriusSQL_Logs.ndf and
SiriusSQL_Transact.ndf. See
Installation of core Salesware modules.
• The Siriusware 4.3 license file (only if you have a pre-made license file) – Siriusware.LIC. This option applies only if you are installing an existing SiriusSQL database. If you are installing an existing database, you already have the license.
• create_AppRole_SiriusSQL.sql and Insert_SiriusSQL_SystemData__xxxx.zip. This option applies only if you are installing a new, “clean” SiriusSQL database. The create_AppRole_SiriusSQL.sql script adds a user named sirius and password sirius that has public rights to the SiriusSQL database (this is necessary for sharing the database on the network – the middleware, SysManager and ReportManager expect this username and password to exist, with public rights). It is not a problem if this script is run multiple times. The Insert_SiriusSQL_SystemData__xxxx.zip file contains three files. Unzip these files into the directory. These three files are: Insert_SiriusSQL_SystemData__xxxx.sql, zipcodes.txt and Insert_SiriusSQL_SystemData_release.txt (Release Notes, for those interested). Insert_SiriusSQL_SystemData__xxxx.sql inserts required system data into the database – this data includes the administrator log-in name (admin), the default global .INI settings and zip codes (using zipcodes.txt). The Insert_SiriusSQL_SystemData_4***.sql script is only run once. Both .sql scripts are executed automatically by the installer if they are in the SiriusTEMP folder (see following steps).
3. Double-click on Install_Siriusware_ServerFiles.EXE from with the SiriusTEMP folder.
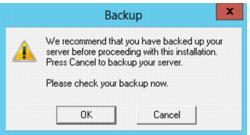
4. You are presented with the following dialog. Click OK.
5. You are presented with the following dialog. Click Next.
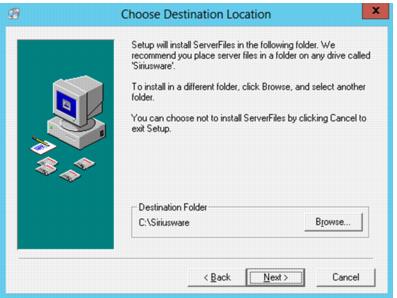
6. You are presented with the following dialog. Accept the default installation directory (C:\Program Files x(86)\Siriusware) unless you have good reasons to place it elsewhere. Click Next.
Note: On 64-bit systems, the default installation directory is C:\Program Files (x86)\Siriusware. On 64-bit systems, Salesware applications run under something called WOW64 (Windows-on-Windows 64-bit), which is an emulator allowing 32-bit applications to run on a 64-bit operating system.
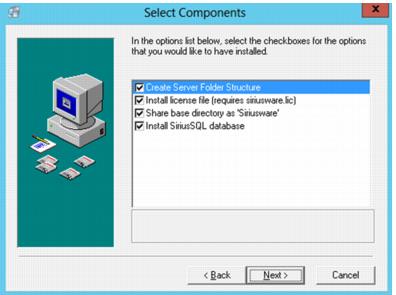
7. You are presented with the following dialog. Un-check Install license file (requires siriusware.lic) if you are installing a new, “clean” SiriusSQL database or if you are installing an existing SiriusSQL database and you don’t have the license file. Leave the other options checked.
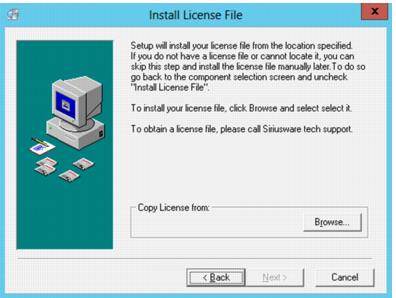
8. If you selected Install license file (requires siriusware.lic) in the previous step, you are presented with the following dialog. Click Browse and navigate to the SiriusTEMP directory (though you are probably already in that directory by default). Select the Siriusware.LIC file and click Open. Then, click Next to move on to the next dialog.
9. You are presented with the following dialog. Click Next to start the installation. The installer creates the Siriusware directory structure and copies the installation files from the SiriusTEMP directory into the \Siriusware\Install directory. It also copies the license file into the \Siriusware\License directory (if you previously selected this option).
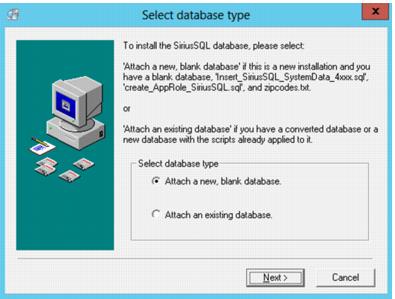
10. You are presented with the following dialog. Select whether you are attaching a new, “clean” SiriusSQL database or an existing SiriusSQL database. Click Next.
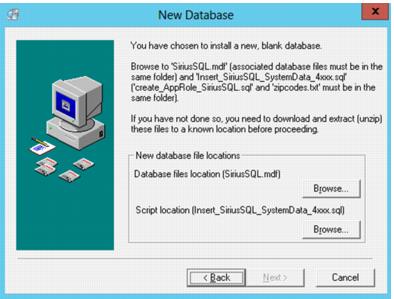
11. If you selected Attach a new, blank database in the previous step, you are presented with the following dialog. Click the Browse buttons and navigate to the SiriusTEMP directory (though you are probably already in that directory by default). Select the SiriusSQL.mdf file click Open. Then, select the Insert_SiriusSQL_SystemData.4xxx.sql file and click Open. Then, click Next. The installer attaches the database to your SQL Server.
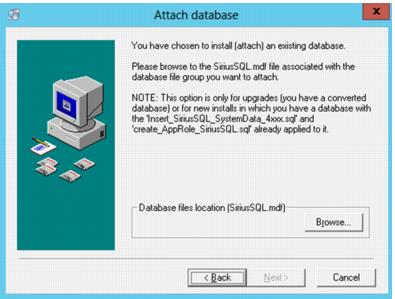
12. If you selected Attach an existing database in the previous step, you are presented with the following dialog. Click Browse and navigate to the SiriusTEMP directory (though you are probably already in that directory by default). Select the SirisSQL.mdf file and click Open. Then, click Next. The installer attaches the database to your SQL Server.
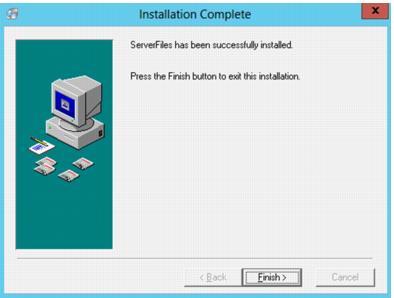
13. You are presented with the following dialog. Click Finish to complete the installation.
14. Copy the application updates into the Siriusware Updates folder (Siriusware\Updates). You need an update for each installer you plan to run (each installer that you copied into the SiriusTEMP folder and that now “lives” in Siriusware\Install). At a minimum, to install the core Salesware modules, you need:
• c_runexe__xxxx.exe
• c_pool__xxxx.exe
• salesez__xxxx.exe
• bookez__xxxx.exe (if you purchased the Private Instruction or Activity/Facility Scheduling modules)
• rentez__xxxx.exe (if you purchased the Rental module)
• tallyez__xxxx.exe (if you purchased the Handheld Retail Inventory component of the Retail module)
• c_sysmgr__xxxx.exe
• c_rptmgr__xxxx.exe
• c_sales__xxxx.exe
15. Copy any layouts you wish to use into the \Siriusware\Layouts folder.
16. Adjust permissions. The Server Files installer ensures that the Siriusware folder is shared. If your network has its own domain and users log into that domain, then their permissions automatically carry over to determine their permissions for access to the Siriusware directory. Otherwise, each Salesware user needs to be added by the server administrator and permissions determined at that time. In general, check that every user has read-only access to the Siriusware directory. The one exception is users who are using SysManager to edit layouts. Those users also need write permission to the \Siriusware\Layouts directory. It doesn’t matter what they log into SysManager as, but they must log into the SysManager computer as a user with write permissions to \Siriusware\Layouts.
17. Delete the SiriusTemp folder and all its contents from the desktop you created earlier.