Program configuration
To set this up there are several steps including the configuration of the pass item that creates the unit value card, the validation products which are redeemed with the unit value card, and the validation products that add additional points to the unit value card.
Pass configuration and sale – the unit value card
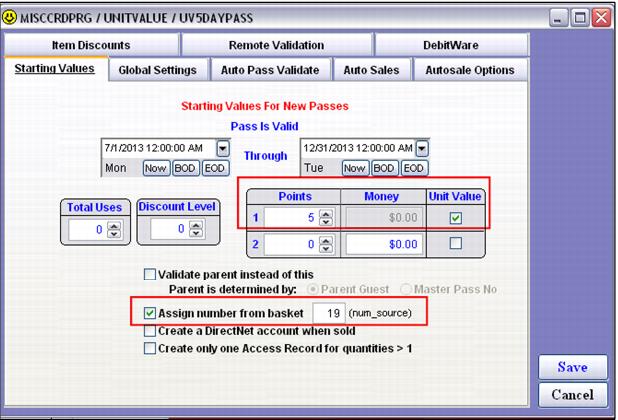
1. Configure a product that creates a pass (the Create Pass radio button is selected on the Action tab).
2. Within the Action Specifics button, on the Starting Values tab assign a certain amount of points. Points1 or Points2 may be used.
3. Make sure to check the Unit Value box next to Points1 or Points2. When you check this box, the Money field that corresponds to the points becomes disabled. The Money field is used to hold the current unit value of the card and thus cannot be modified manually for this product.
4. Uses per day, uses per week, blackout dates, shifts, etc., can be set up just like any other pass product.
5. Optional: A card number may also be assigned to these passes at the time of sale, because both card numbers and pass numbers can be used for validation in unit value programs.
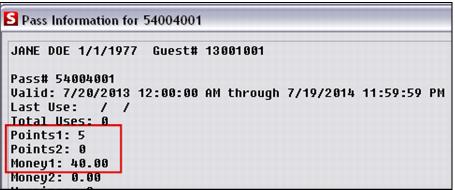
6. Sell the pass. Look up the pass and note that the Money1 or Money2 field (depending on the point field selection at configuration) is now populated with the unit value. This was calculated by dividing the sale price of the pass item by the total points configured in Points1 or Points2.
Validation product configuration and sale – redemption items
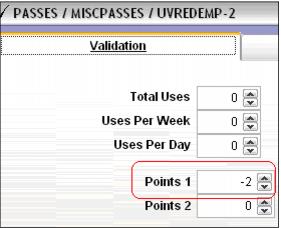
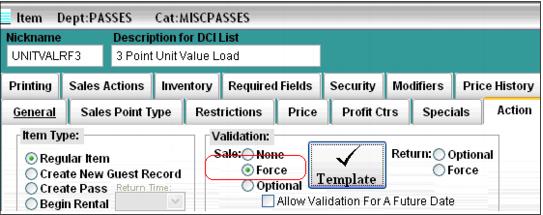
1. Configure an item that has either forced or optional validation.
2. In the validation template deduct the appropriate number of points on the Validation tab (typically -1 for a one use product, -2 or a two use product, etc.,).
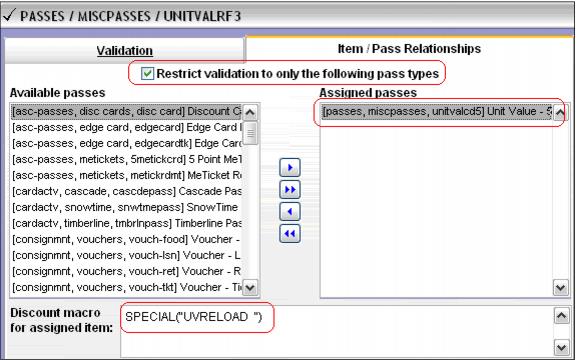
3. On the Item/Pass Relationship tab, select the Unit Value Pass product and move it from the Available Passes window to the Assigned Passes window.
4. If a special is automatically applied to the validation product (in order to capture the variance in the regular vs. adjusted unit value price), configure a macro in the discount macro box. The syntax for this macro is SPECIAL(“XXXXXXXXXX”) making sure that the special nickname is padded to ten spaces.
5. Sell one of the validation items and validate that sale with the unit value card created in step #6 in the previous section. Note that the price of the item adjusts to the current “unit value” of the card validating the item, and a special has automatically been applied to the item that reflects the difference in the item’s price (the difference between the price of the item before and after validation).
The following screen capture shows the line item before validation with unit value card:
The following screen capture shows the line item after validation with unit value card:
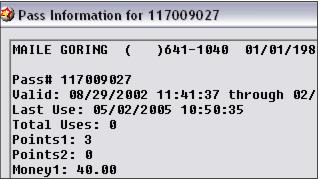
The unit value pass still has a “unit value” of $40, but 2 points are deducted from the original 5. The new total value of this card is $120 (3 points X $40):
Validation product configuration and sale – “add points” items
1. Configure an item that has forced validation.
2. In the validation template, add the appropriate number of points on the Validation tab. For instance, if the item is designed to add 3 points, the number entered in the validation template for points1 or points2 would be a positive 3.
3. On the Item/Pass Relationships tab, select the Unit Value Pass product and move the pass item from the Available Passes to the Assigned Passes window. Check the Restrict validation to only the following pass types check box if applicable.
4. If a special is automatically applied to the validation product (the “add points” product), configure a macro within the discount macro box. The syntax for this macro is SPECIAL(“XXXXXXXXXX”) , making sure that the special nickname is padded to ten spaces.
Note: This special is not used to track discounts applied to the “add points” item (the way it is used in “redemption” items), but may be useful in tracking overall unit value program activity through reports such as the Specials Performance Report.
5. Sell the “add points” validation item and validate it with the unit value card sold above.
The following screen capture shows the line item before validation:
The following screen capture shows the line item after validation:
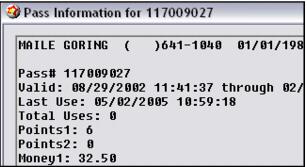
6. Look up the pass record for the unit value card and note that the point value has increased and the Money field has been updated to reflect the new “unit value” of the pass:
• 3 existing points multiplied by current unit value of $40 = $120
• 3 more points added with a value of $75
• New value of the card is $195
• New point total is 6
• $195/6=$32.50 for the new ‘unit value’
Unit value calculation details:
When a unit value card has points added, the money1 or money2 field updates to reflect the new unit value of the card.
Example:
A card has 2 points with a current unit value of $30 making the total value of the card $60. An “add points” validation product is sold that adds 5 points and costs $100. The new point total on the card is 7 and the new unit value (held in the Money field) is $22.8571 (current value of $60 plus new value of $100 divided by new point total of 7 equals $22.8571). Items validated with this card now adjust their price to $22.8571 (rounded to two decimals).