Four options for online pass renewals
Option #1 – Renew to the same pass product
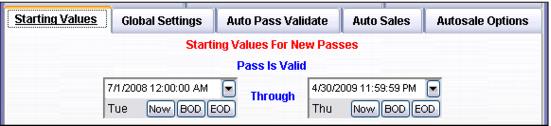
1. Update the Starting Values > Pass is Valid dates for the item and add the product to your E-Commerce item tree if it is not already there.
2. Add pass DCI to AllowedRenewals key in site config. The value for this key must have the Department, Category and Item (DCI) nicknames padded with spaces to equal ten characters each (thirty total). Multiple entries must be separated by a comma (no space after the comma).
Site Admin Panel > Pass Renewal Settings > AllowedRenewals value = PASSES ADULTPASS ADLOPRPASS
3. Set the renewal time period via the RenewalSpan key. The value entered for this key sets the number of years counting back from today that a pass is eligible for renewal. So if the value is 2 and today’s date is 4/24/2014, then, only passes that have expired between 4/24/2012 and 4/24/2014 can be renewed via the E-Commerce pages.
Site Admin Panel > Pass Renewal Settings > RenewalSpan value = 2
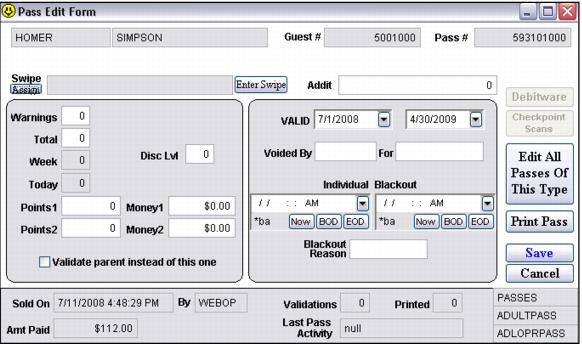
4. After clicking the Lookup Pass button, the visitor/guest is taken to the ItemShow.aspx page with the appropriate pass product there.
Note: also that in this example the guest is now the Head Guest in the sale as if he had done a normal verified guest lookup – this is because of Site Admin Panel > Pass Renewal Settings > RenewVerifyAll value =1 in the site config file.
The visitor/guest checks out and pays and when Sales Host processes the sale successfully, the sale is finalized and the new pass is associated with the guest.
Option #2 – Renew to a different pass product.adadmin
1. Create and configure this new pass product and add the product to your E-Commerce item tree. Add the new pass product DCI to the AllowedRenewals key in site config. The value for this key must have the Department, Category and Item (DCI) nicknames padded with spaces to equal ten characters each (thirty total). Multiple entries must be separated by a comma (no space after the comma).
Site Admin Panel > Pass Renewals Settings > AllowedRenewals value = PASSES ADULTPASS 09ADLOPRPS
2. Set the renewal time period via the RenewalSpan key. The value entered for this key sets the number of years counting back from today that a pass is eligible for renewal. So if the value is 2 and today’s date is 4/24/2014, then, only passes that have expired between 4/24/2012 and 4/24/2014 can be renewed via the E-Commerce pages.
Site Admin Panel > Pass Renewals Settings > RenewalSpan value = 3
3. Configure the DCI2DCI.xml file (located in C:\Inetpub\wwwroot\E-Commerce\XMLFiles) by entering the DCI of the pass you want to have guests be able to renew into the old_dept, old_cat and old_item tags.
Note: DCI nicknames must be padded with spaces to equal ten characters each if necessary. Then, in the same section enter the DCI of the pass you want to be sold to replace the old pass into the new_dept, new_cat and new_item tags.
Note: add additional sections beginning with <Table> and ending with </Table> as needed to the DCI2DCI.xml file.
<Table>
<old_dept>PASSES </old_dept>
<old_cat>ADULTPASS </old_cat>
<old_item>08ADLOPRPS</old_item>
<new_dept>PASSES </new_dept>
<new_cat>ADULTPASS </new_cat>
<new_item>09ADLOPRPS</new_item>
<group></group>
</Table>
4. After clicking the Lookup Pass button the visitor/guest is taken to the ItemShow.aspx page with the appropriate pass product there.
The visitor/guest checks out and pays and when Sales Host processes the sale successfully, the sale is finalized and the new pass is associated with the guest
Option #3 – Renew to a configurable list of products.
The third way to set up pass renewals is to allow the visitor/guest to choose from a list of products when he goes to renew his pass online. This is accomplished by utilizing a portion of the Group (account) functionality (described in detail in the section Group (account) functionality setup) that allows access to a specified menu of items.
1. Create and configure the pass products as needed.
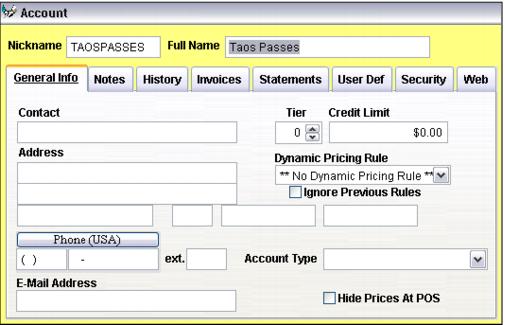
2. Create a new account in SysManager – it only needs a Nickname and Full Name.
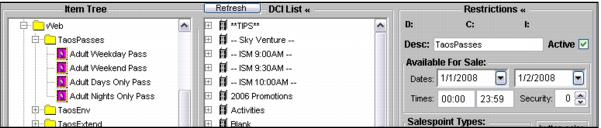
3. Create a new item tree group within your existing E-Commerce item tree folder and give it the same name as account Nickname created above.
4. Add the pass products created in step a. above to that item tree group.
5. Set the Available For Sale dates to sometime in the past. This is necessary so that this item tree group is not displayed to guests who are not renewing their pass.
6. Add the old pass product DCI to the AllowedRenewals key in site config. The value for this key must have the Department, Category and Item (DCI) nicknames padded with spaces to equal ten characters each (thirty total). Multiple entries must be separated by a comma (no space after the comma).
Site Admin Panel > Pass Renewal Settings > AllowedRenewals value = PASSES ADULTPASS 2007ADSEAS
7. Set the renewal time period via the RenewalSpan key. The value entered for this key sets the number of years counting back from today that a pass is eligible for renewal. So if the value is 2 and today’s date is 4/24/2014, then, only passes that have expired between 4/24/2012 and 4/24/2014 can be renewed via the E-Commerce pages.
Site Admin Panel > Pass Renewal Settings > RenewalSpan value = 3
8. Configure the DCI2DCI.xml file (located in C:\Inetpub\wwwroot\E-Commerce\XMLFiles) by entering the DCI of the pass you want to have guests be able to renew into the old_dept, old_cat and old_item tags.
Note: DCI nicknames must be padded with spaces to equal ten characters each if necessary. Then, in the same section leave the new_dept, new_cat and new_item tags empty and enter the account Nickname you created above into the group tag (the account Nickname is not padded out to ten characters).
Note: add additional sections beginning with <Table> and ending with </Table> as needed to the DCI2DCI.xml file.
<Table>
<old_dept>PASSES </old_dept>
<old_cat>ADULTPASS </old_cat>
<old_item>2007ADSEAS</old_item>
<new_dept></new_dept>
<new_cat></new_cat>
<new_item></new_item>
<group>TAOSPASSES</group>
</Table>
9. After clicking the Lookup Pass button the guest is redirected to the ItemList.aspx page where the group of items just created in the TaosPasses item tree group is displayed.
The visitor/guest selects the pass he wants from the list, checks out and pays and when Sales Host processes the sale successfully, the sale is finalized and the new pass is associated with the guest.
Option #4 - Extend the expiration date of an existing membership.
Note: This is a variation of option #3 and allows organizations that offer yearly memberships the ability to renew those memberships by extending the expiration date.
Set up a one-year membership card:
1. Create an item and on the General tab set Time Span to 365 days and check the box for Round time span to end-of-month if desired.
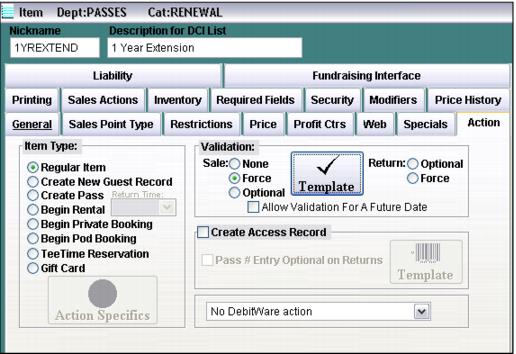
2. On the Action tab set Item Type to Create Pass.
3. Press the Action Specifics button and on the Starting Values tab add any points or uses as desired.
Create the renewal products:
1. Create one or more items and on the Action tab set Item Type to Regular Item and select the Force validation radio button.
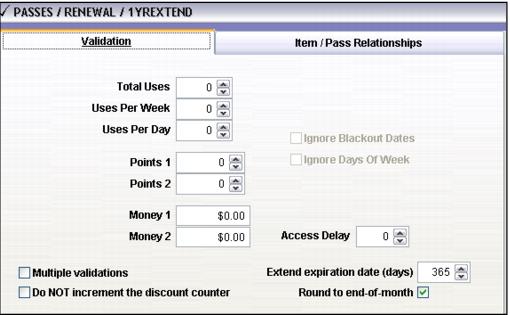
2. Press the Template button and on the Validation tab enter 365 for the Extend expiration date (days) and check the Round to end-of-month check box.
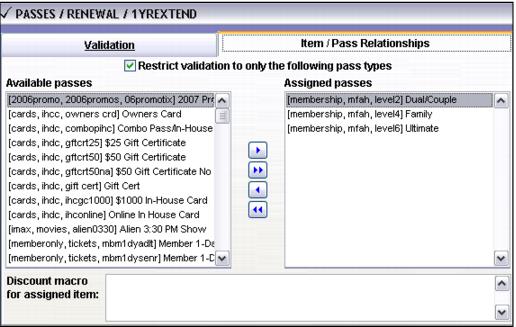
3. Go to the Item/Pass Relationships tab and assign the passes for which this renewal product is valid.
4. Create a new account in SysManager – in this example, TaosExtend.
5. Create a new item tree group within your existing E-Commerce item tree folder and name it the same as the account Nickname – TaosExtend in this example.
6. Add the renewal products to that item tree group.
7. Set the Available For Sale dates to sometime in the past. This is necessary so that this item tree group is not displayed to guests who are not extending the expiration date of their membership.
8. Add the old pass product DCI to the AllowedRenewals key in site config. The value for this key must have the Department, Category and Item (DCI) nicknames padded with spaces to equal ten characters each (thirty total). Multiple entries must be separated by a comma (no space after the comma).
Site Admin Panel > Pass Renewal Settings > AllowedRenewals value = MEMBERSHIPMFAH LEVEL2 ,MEMBERSHIPMFAH LEVEL4 ,MEMBERSHIPMFAH LEVEL6
9. Set the renewal time period via the RenewalSpan key. The value entered for this key sets the number of years counting back from today that a pass is eligible for renewal. So if the value is 2 and today’s date is 4/24/2014, then, only passes that have expired between 4/24/2012 and 4/24/2014 can be renewed via the E-Commerce pages.
Site Admin Panel > Pass Renewal Settings > RenewalSpan value = 2
10. Configure the DCI2DCI.xml file (located in C:\Inetpub\wwwroot\E-Commerce\XMLFiles) by entering the DCI of the pass you want to have guests be able to renew into the old_dept, old_cat and old_item tags.
Note: DCI nicknames must be padded with spaces to equal ten characters each if necessary. Then, in the same section leave the new_dept, new_cat and new_item tags empty and enter the account Nickname you created above into the group tag (the account Nickname is not padded out to ten characters).
Note: add additional sections beginning with <Table> and ending with </Table> as needed to the DCI2DCI.xml file.
<Table>
<old_dept>MEMBERSHIP</old_dept>
<old_cat>MFAH </old_cat>
<old_item>LEVEL2 </old_item>
<new_dept></new_dept>
<new_cat></new_cat>
<new_item></new_item>
<group>TAOSEXTEND</group>
</Table>
<Table>
<old_dept>MEMBERSHIP</old_dept>
<old_cat>MFAH </old_cat>
<old_item>LEVEL4 </old_item>
<new_dept></new_dept>
<new_cat></new_cat>
<new_item></new_item>
<group>TAOSEXTEND</group>
</Table>
<Table>
<old_dept>MEMBERSHIP</old_dept>
<old_cat>MFAH </old_cat>
<old_item>LEVEL6 </old_item>
<new_dept></new_dept>
<new_cat></new_cat>
<new_item></new_item>
<group>TAOSEXTEND</group>
</Table>
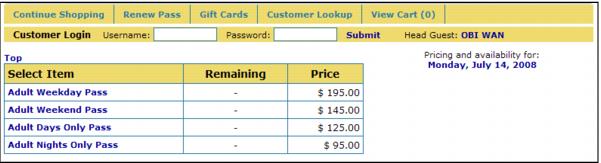
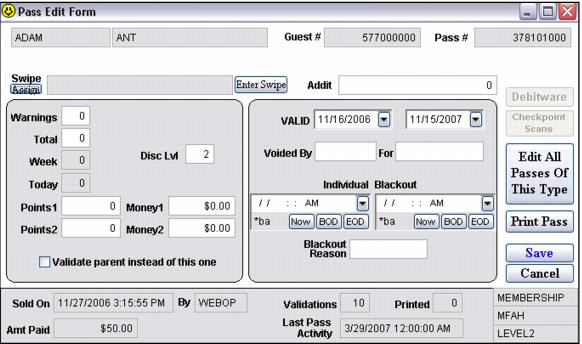
The visitor/guest enters his membership number and password on the RenewPass.aspx page and clicks the Lookup Pass button to begin the renewal process – in this example the membership being renewed is valid to 11/15/2007.
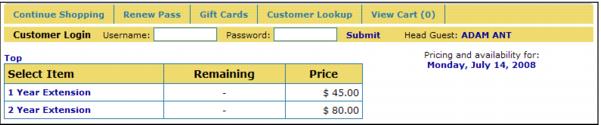
Next, the visitor/guest is taken to the ItemList.aspx page, which displays the list of renewal products available.
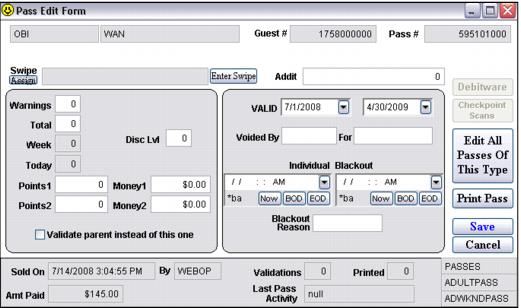
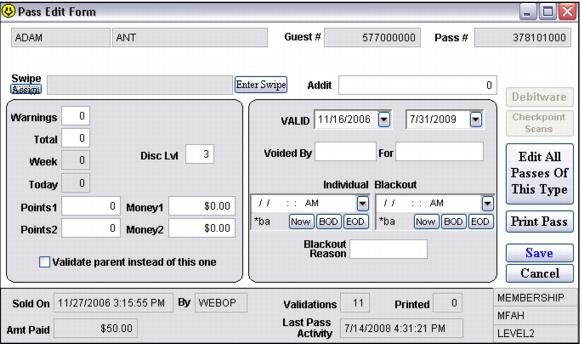
The visitor/guest selects the 1 Year Extension option, checks out and pays and when Sales Host processes the sale successfully, the sale is finalized and the pass expiration date is, in this case, extended to one year from the date of purchase (7/14/2008) and is rounded to the end of the month.