FileSync server
To install FileSync on the FileSync server:
1. Designate the salespoint your FileSync server uses from SysManager > Activities > System Lists > Salespoints.
2. Ensure that you have a FileSync license assigned to this salespoint from SysManager > Preferences > Sales Point Licenses.
3. Ensure that the salespoint is assigned the correct item tree for Food Service.
4. Run Install_Siriusware_CommonFiles.msi on the FileSync Server.
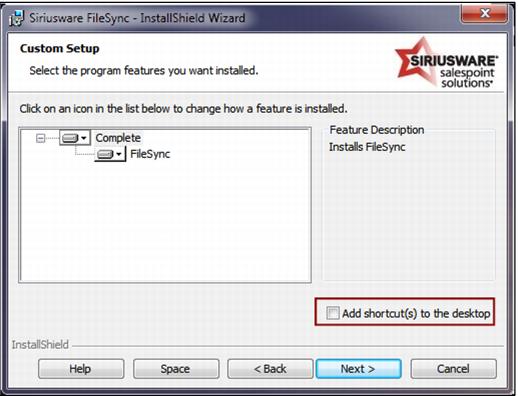
5. Run Install_Siriusware_FileSync_xxxx.msi on the FileSync Server.
• Check the Add shortcuts to the desktop.
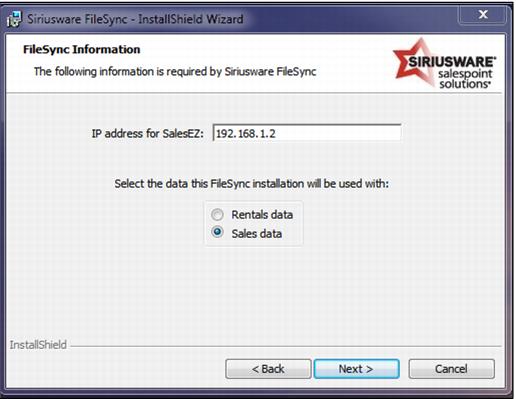
• Enter the IP address for SalesEZ PoolManager and Select Sales data for Food Service installation.
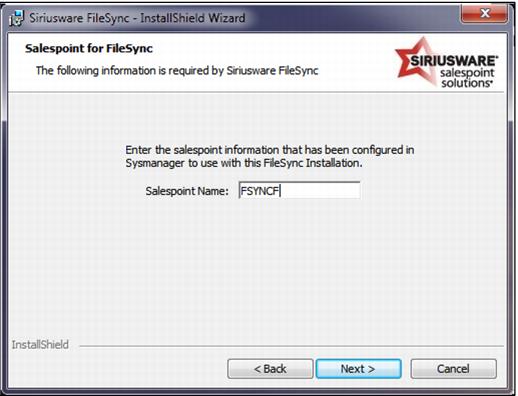
• Name the FileSync Instance the nickname you specified for the Salespoint License.
6. Finish the Install.
7. On the desktop, double click on the Update FileSync icon to get the latest update from your Siriusware/Updates folder.
8. For Food Service FileSync installation, perform the following steps:
• Run Sales on one of the salespoints.
Note: that if this is a salespoint that uses Shared Data, a message displays saying, “Unable to Open Local Files.” Click OK.
• Go to the C:\Programdata\Siriusware\Sales directory and find the Tables.Config file. Move that file to the C:\Program Files\Siriusware\FileSync folder on the FileSync server.
Note: If using Windows 64-bit machines, the data path will be c:\Program Files (x86)\siriusware\FileSync
• Shutdown the Sales application after retrieving Tables.config.
• Double Click on the FileSync Monitor > Start FileSync and wait until the data is ready.
• Go to the local FileSync folder (C:/ProgramData/ Siriusware/ FileSync) and open Data. Look at the Itemtree.dbf. Check to see if any data populated the table. If not, this is known to happen occasionally. Simply delete any Itemtree.dbf and cdx files, and then restart FileSync. Item tree information should repopulate the Data folder from the server and Sales should work properly.
FileSync is now available for use by salespoints. The following .INI setting must be added to Sales32c_System.INI file for each salespoint to enable the salespoints to access the FileSync server:
[Data]
SharedDataPath=<any valid path to local FileSync server>
Example:
[Data]
SharedDataPath=\\192.168.2.45\FileSync\Data\
(Where 192.168.2.45 is the IP address of the FileSync computer.)
The
Data folder must be shared and operator log-ins on the salespoint must have permissions to the folder. The appropriate shared FileSync folder is located in
C:\Programdata\Siriusware\location. See
Sales interface to FileSync for more information about
.INI settings on the salespoint.