Purchase Orders (POs)
When ordering inventory with a Purchase Order (PO), a copy of the PO can be printed and stapled to the original company PO or printed POs from Salesware module can replace internal POs currently used.
Note: In order for a product to be ordered on a PO, it must be entered in the DCI list first. See Data entry for retail item creation.
Note: The PO creation capability can be configured to use a custom layout. The layout must be named Xinvent_receiver or Xinvent_poform and must reside in the Layouts folder. Xinvent_receiver is the purchase order creation/receiving layout and xinvent_poform is the purchase order/print purchase order layout. When one or both of these layouts is stored in the Layouts folder, SysManager prints PO forms using this external layout instead of the hard-coded one. This layout can be edited in SysManager > Activities > Edit Layouts. For more information on layouts, see Salesware Layouts. These layouts can be downloaded from the Siriusware Information Portal (Downloads > Layouts).
To create a PO:
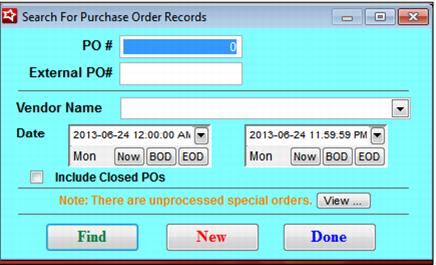
1. Go to SysManager > Activities > Inventory Activities > Purchase Orders. The Search For Purchase Order Records dialog is displayed (see the following screen capture). From this dialog you can search for existing POs or create a new one.
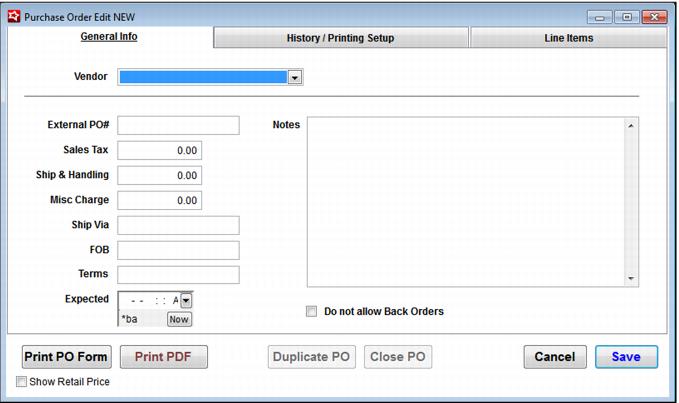
2. Click the New button and the Purchase Order Edit NEW dialog is displayed. See the following screen capture:
Note: The History/Printing Setup tab provides information about the PO, including, the date and time it was created, the operator who created it and the location where it was created.
3. Using the drop-down menu, select the Vendor for this PO.
4. Enter any of the following additional information you need:
User interface element | Description |
External PO# | A PO# provided by a vendor. This PO# is in addition to the PO number automatically generated by Salesware for the PO. |
Sales Tax | Dollar amount of sales tax for this order. |
Ship & Handling | Dollar amount for the shipping and handling for this order. |
Misc Charge | Dollar amount for any miscellaneous charge for this order. |
Ship Via | The shipping mode to use for this order. |
FOB | Freight On Board. |
Terms | Payment terms. |
Expected | Expected arrival of shipment. |
Notes | Any notes relevant to this order (prints in the top right-hand corner of the PO). |
Do not allow Back Orders | Check if back orders are not allowed. |
Note: This information prints in the header of the PO. To print POs, see
To print a PO:.
To enter line items for regular and tracking products:
1. Access the Line Items tab. On the Purchase Order Edit NEW dialog, click the New button.
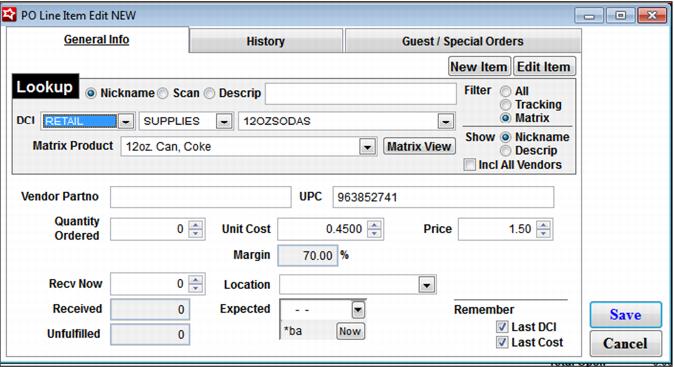
2. The following message prompt appears, “PO Has Not Been Created – Save PO? Yes/No,” Click Yes and the PO Line Item Edit NEW dialog is displayed. See the following screen capture of the PO Line Item Edit NEW dialog:
The following user interface elements are included on this dialog:
User interface element | Description |
Nickname Lookup | Type in a Nickname and, if found, the DCI fields are automatically populated with the information for that item. Otherwise, the following message appears on a pop-up dialog box, “Item not found!” |
DCI | First dropdown: Department. |
Second dropdown: Category. |
Third dropdown: Item. |
Show (Radio buttons) | Nick Name − Shows item nickname in third dropdown of DCI. |
Description − Shows item description in third dropdown of DCI. |
Vendor Partno | Vendor part number |
UPC | UPC for the item (can be scanned directly into this field) |
Quantity Ordered | Quantity ordered |
Unit Cost | Cost of the item before markup |
Price | Retail price of the item |
Margin | Percent markup based on Unit Cost and Price (automatically populated) |
Recv Now | Quantity received now |
Received | Quantity received previously (an order may be filled via multiple shipments) (automatically populated) |
Unfulfilled | Difference between Quantity Ordered and Recv Now plus Received (automatically populated) |
Location | The location where the inventory is received |
Expected | Date shipment is expected |
Filter | All − Show all items |
Tracking − Show tracking items |
Matrix − Show matrix items |
Remember | Last DCI − If checked, automatically populates DCI with last item |
Last Cost − If checked, automatically populates Unit Cost with last cost for this item |
3. Using the DCI dropdown menus, select the department, category and item for the product to be ordered.
Note: You can filter the products that appear in this list by using the Filter fields (All, Tracking, Matrix) to see all products, only tracking products or only matrix products.
Note: You can show the item descriptions in the Item field and dropdown menu rather than the nickname by using the Show fields (Nick Name, Description).
Note: The next line item that is entered can have the last DCI selected displayed to make ordering efficient, in case you are ordering multiple products in the same department and category. Simply check the Remember Last DCI check box.
4. Enter the Quantity Ordered for this product.
Note: You can enter and receive a PO in the same step, simply by entering the number received in the Recv Now field.
5. Enter the date the merchandise is Expected and the day of the week is automatically displayed in the field below.
Note: This date is necessary for backordered information such as is included in the On Order/Backorder Report.
6. Enter a Unit Cost for the product.
Note: If you do not enter a Unit Cost for the product and you attempt to save the line item, the following message is displayed, “WARNING! Unit cost is zero. Proceed with save? Yes/No.” This is because any cost analysis or profit/loss information would be useless without accurate unit cost data.
7. Select a Location to which the merchandise is shipped from the drop-down menu.
Note: You can specify a default Location on the Purchase Order Edit dialog where inventory is received if no specific Location is chosen on the PO Line Item Edit dialog. Click the Default Receive Location check box and select a Default Receive Location from the dropdown list.
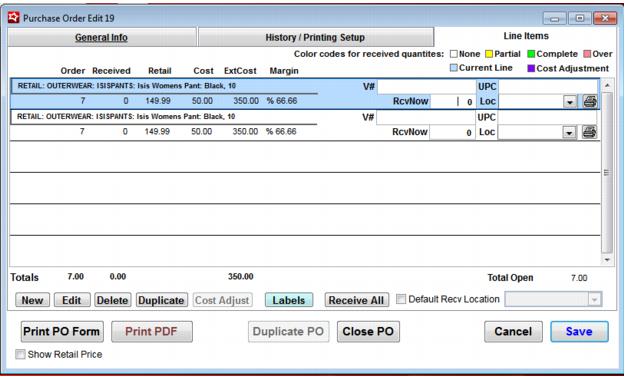
8. Click the Save button for the line item and it is displayed in the line item grid on the Purchase Order Edit dialog.
Note: Certain information can be entered into the line item grid after the line item has been added: Location, UPC, Vendor Partno and Recv Now.
9. Click the Save button on the Purchase Order Edit dialog for the PO.
To enter line items for matrix tracking products:
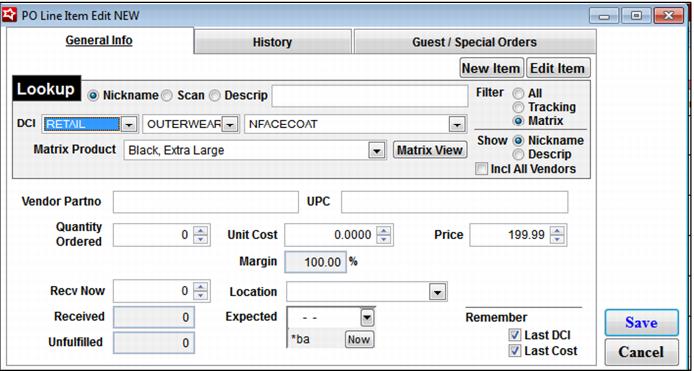
The process for entering line items for matrix tracking products is basically the same as described in To enter line items for regular and tracking products: except that you must select the Matrix radio button when selecting the Filter. This causes an additional Matrix Product dropdown to appear, as well as a Matrix button the allows you to display and fill on the Matrix Purchase Order dialog. See the following screen captures of the PO Line Item Edit dialog and the Matrix Purchase Order dialog:
To order a single matrix product sub-item:
If you want to just reorder twelve medium blue bibs, you don’t need to access the entire Matrix Purchase Order dialog. The sub-item can be ordered more simply. To reorder a single sub-item in a matrix:
Note: The Matrix Product field defaults to the first listed sub-item in the matrix. If you want to enter values for only a single sub-item, you can select it from this dropdown list and enter the following values here.
1. Enter a Vendor Partno that represents a number relevant to the vendor.
2. Enter or scan the UPC for the product.
3. Enter a Quantity Ordered.
Note: Notice that when you tab off this field, the Unfulfilled quantity matches the Quantity Ordered field. When the product is received, the unfulfilled quantity reflects the number of products that were ordered that have as yet to be received.
4. Enter the date they are Expected.
5. Enter a Unit Cost for the product.
Note: If you do not enter a Unit Cost for the product and you attempt to save the line item, the message, “WARNING! Unit cost is zero. Proceed with save? Yes/No,” is displayed. This is because any cost analysis or profit/loss information would be useless without accurate unit cost data.
6. Select a Location to designate at which Location this sub-item is received.
Note: If you designate a Location for a product, then when the product is received, it is allocated to that Location. If you do not want to allocate inventory to particular Locations, do not use this field.
Note: Currently you cannot split a single line item between two Locations. Therefore, two line items must be entered (in the same PO or with two POs) with different Locations to allocate the same sub-item to two different Locations.
7. Select Remember Last DCI if you would like this product to remain selected the next time you enter this dialog.
8. Click the Save button.
To order multiple matrix product sub-items:
It is most efficient when ordering several sub-items in a matrix to directly access the matrix for that item, because the order amounts can all be entered into a single dialog, and then saved. To enter amounts for more than one cell of a matrix product:
Note: If you are ordering for more than one sub-item, disregard the remaining fields on the General Info tab. You enter this same data for all sub-items on the Matrix Purchase Order dialog.
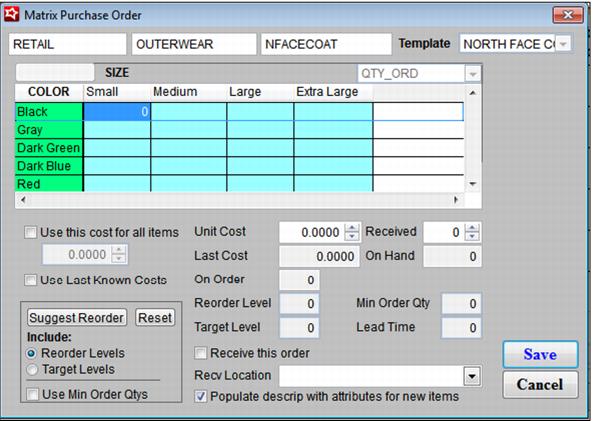
1. Click the Matrix button on the right-hand side of the Matrix Product field and the Matrix Purchase Order dialog is displayed with the Retail matrix associated with the selected matrix product.
Note: The Matrix button displays only if the product is a matrix product.
Note: The values in the grid correspond to the number of each matrix sub-item you would like to order. The fields on the screen below the grid apply to the highlighted cell only.
2. Check Use this cost for all items and enter a cost in the field below it if you would like to populate the entire matrix with the same unit cost. Otherwise, enter a cost for the highlighted cell in the Unit Cost field.
Note: When you select the Use this cost for all items check box, the Unit Cost field is automatically grayed out to prevent entry.
Note: When you enter in numbers to reorder, they appear underlined and in red if you haven’t entered a unit cost for that sub-item.
3. The Last Cost field automatically populates with the last cost that was paid for this item. If the item has not been ordered before, the value in this field is 0.00.
4. The number of this sub-item on hand displays in the On Hand field.
5. The current On Order, Reorder Level, Target Level, Min Order Qty and Lead Time values entered previously display in the relevant fields.
6. Select Populate descrip with attributes for new items if you would like the Descrip field in the line items grid to be populated with the two descriptive attributes for this sub-item. (Otherwise, no description is filled into this field.)
7. At this point you can either manually enter the number to order for each cell in the grid or you can use the suggested reorder feature, discussed in the following section.
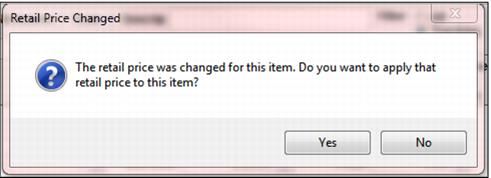
Changing a line item price
If changes are made to an item's price in Purchase Order Edit dialog, a warning will display, asking if the user wants to apply the changes to the item right away.
Saying Yes to this prompt will cause the price updates to be made right away. Previously they would not be made until the purchase order was saved.
To use the suggested reorder feature:
You can automate the ordering/PO process by using the Suggest Reorder button on the Matrix Purchase Order dialog. When this button is clicked, the suggested reorder quantities entered on the Item dialog populate the fields. Use the Reset button to clear the fields to zeroes.
Note: The suggested reorder quantities, once they populate the fields, can be edited manually.
1. Before using this feature, decide the standard to use for suggested reorder values and click the appropriate radio buttons and/or check boxes. Select one of the radio buttons described in the following table:
Suggest Reorder radio button | Description |
Reorder Levels | Brings the current inventory level up to the Reorder Level value entered for this item when it was defined. Example: If there are 5 of the products on hand, there are 5 on order and the reorder level is 15, the cell is populated with 5; it takes 10 more of this product to bring the current level of 5 (plus the 5 on order) up to the reorder level of 15. |
Target Levels | Brings the current inventory level up to the Target Level value entered for this item when it was defined. Example: If there are 5 of the product on hand, there are 5 on order and the target level is 20, the cell is populated with 10; it takes 10 more of this product to bring the current level of 5 (plus the 5 on order) up to the target level of 20. |
2. Then, select one or both of the check boxes listed in the following table:
Suggest Reorder check boxes | Description |
Use Min Order Qtys | Brings the current inventory level up to the Reorder Level or Target Level (whichever is checked) and ensures that the minimum order quantity required by the vendor is also used. This check box overrides the Reorder Levels and Target Levels if the Min Order Qty is greater than the Reorder Level or Target Level Example: If you attempt to order six of each of something and the vendor requires twelve, your order is changed to twelve. |
Use Last Known Costs | Uses the last known cost at which the product was ordered. |
3. Click the Suggest Reorder button and the specified values are displayed in the individual cells.
4. Edit any value in any of the cells by highlighting that cell.
Note: If you’d like to restore the grid to zeroes, click the Reset button.
Warning message: “Re-order level is not set for all items.”
When in a Purchase Order and checking the Suggested Reorder Level for a matrix item in Matrix View, if all of the matrix items in that department, category and item do not have reorder levels entered, the operator receives the message, “Re-order level is not set for all items. The operator needs to set re-order level item in order to use 'suggest re-order' functionality.” This has been instigated to prevent improper display on the Suggested Reorder Level dialog and to assure that valid values are achieved when running the Reorder Report. The Target Level selection now computes the target level correctly following this equation, Target Level minus On Hand minus On Order. If the equation returns a negative value the Target Level is returned as zero.
To print a PO:
1. On the Purchase Order Edit dialog, click the Print PO Form button. The PO is printed to the screen for preview. The format of the preview is based on your default Windows printer. If the PO doesn’t format correctly, you may need to change default printers.
2. Click the Print Report button (printer symbol) in the Print Preview toolbar. The PO is sent to the printer and the Purchase Order Edit dialog is restored.
Note: You also have the option of creating a PDF version of the PO by using the Print PDF button.
Duplicating line item entries
Once an item is added to the Purchase Order, you can duplicate the item from the Purchase Order Edit dialog. Simply select the Duplicate button and it is immediately available for entry into the Purchase Order, without having to close the form and recall the Purchase Order.