TallyMan module installation on MC9090-G
This section describes how to install TallyMan module on the MC9090-G (usually running the Windows Mobile 5.0 operating system).
Step-by-step installation:
1. Install ActiveSync on the host PC (available on Microsoft web site).
Note: ActiveSync is not installed on the data server. It is usually installed on a PC in the office manager’s office.
2. Warm-boot the unit by holding down the power button for five seconds or more.
3. Set the scanner into its cradle, which is hooked up to the host PC.
4. If this is the first time you are connecting to ActiveSync, set up a Standard Partnership. Uncheck all options.
Note: Communications between ActiveSync and the scanner are used primarily for file transfer between the two devices. There is no need to set up communications that are any more sophisticated than this.
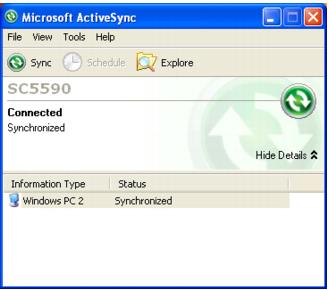
5. When the connection is made, something similar to the following is displayed on the host PC screen:
6. Click on the Explore button. You get a dialog similar to this:
7. Download the TallyMan module installation program (
tallymanppc_xxxx_4xxx.zip) and unzip the contents into a temporary folder. (See
Introduction for the name of the
.zip file you need for your particular scanner.) You may need to install a copy of WinZip or a similar program to open the
.zip file.
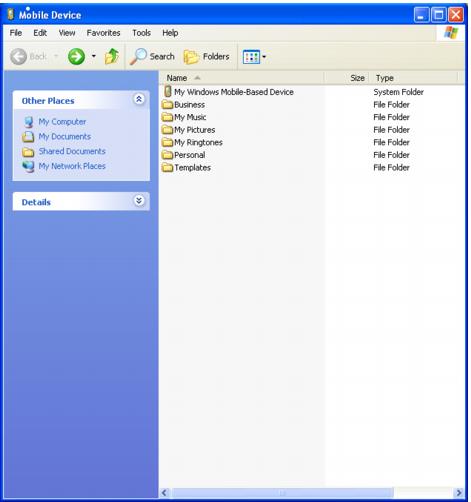
8. With the scanner in its cradle, use the pointer to browse to (“tap to”) Start > Programs > File Explorer > My Documents > My Device > My Documents on the scanner. My Device is accessed by clicking on the directory name My Documents at the top of the screen, resulting in the dropdown menu shown in the following screen capture:
9. The same file list displayed on the host PC in the ActiveSync window displays on the scanner (minus the My Windows Mobile Device icon and description). Copy all of the installation files from the temporary folder you created into the My Documents directory by simply selecting all files and dragging them onto the scanner (into this location) via the ActiveSync window. The files appear on the scanner.
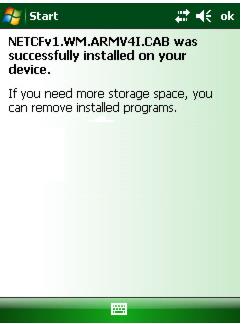
10. Install the .CAB files by double-clicking (“tapping”) each file using the scanner interface (one at a time) starting with NETCFv1.WM.ARMV41.CAB (or similar name). You get a response similar to the following:
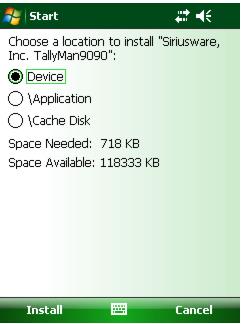
11. The last file you install is the TallyMan application itself. When you install the application (TallyMan9090_install.CAB), you are asked where to install it. Choose Device, which causes it to be installed in the Program Files directory in a folder named TallyMan9090:
12. Perform a warm reboot of the scanner by holding down the power button for five seconds or more. Now, the scanner can be operated off its cradle.
13. From the Start menu, choose Settings.
14. Select the Connections tab and click on Beam.
15. Uncheck the box for Receiving (receive all incoming beams and select discoverable mode).
Note: If the handheld unit is not connecting to the access point, check your wireless settings. You are able to “
ping” both your scanner and the TallyEZ middleware computer from any computer on your network. See the
Salesware Access Control document for more information on how to configure your scanner to work with your access point. See
TallyEZ and
Configuration for more information on TallyEZ setup and how to license and configure your scanner to work with TallyEZ application.
Note: TallyMan module can be removed from the device by navigating to Start > Settings > System tab > Remove Programs.