Installing Sales
The Sales application can be installed on any computer on the network that has network access to the SQL Server. The Sales application is the operator interface for all of the POS computers on the network. Each salespoint receives a separate installation of the Sales application and a unique name is required for each. For criteria you use when choosing salespoint names, see the Salesware User and Ticketing Guide for Beginning Users. If Sales is being installed on a computer that has already had the Common Files installer run on it (such as the SysManager or ReportManager computer) you can skip the step of installing Common Files application. You need administrator privileges on the computer where Sales is installed.
The Sales installer:
• Creates the \ProgramData\Siriusware\Sales and \Program Files\Siriusware\Sales directories and associated files.
• Installs a desktop shortcut to Sales; a training shortcut to Sales can be installed as well.
• Creates the \Program Files\Siriusware\Resources folder.
Note: Before installing any salespoints, you need to have a license file in Siriusware\License. If you installed an existing database when you installed Server Files application, you probably already installed this license. If you installed a new, “clean” database, you need to get a license file from Siriusware Technical Support. When calling Siriusware Technical Support for a license file, you need to provide the client number that was assigned to your installation. Get this Client # from SysManager > Help > About SysManager.
Before salespoint installation, verify that there are enough salespoints created in SysManager for the entire installation. Do this by going to SysManager > Activities > System Lists > Sales points menu and counting the number of names; this number equals the number of salespoints to be installed. Salespoints include SimpleCharge salespoints, Sales Hosts for E-Commerce and Kiosks capability. If there are not enough salespoints, simply add more by using the New button. You need a license for each salespoint added. Assuming you have an available license for a new salespoint, the name of the salespoint also appears on the Sales Point Licenses dialog (SysManager > Preferences > Sales Point Licenses) when you add a new salespoint. From the Sales Point Licenses dialog you also verify that the salespoints are licensed correctly. Ensure that the Mode is set correctly (C=Classic Sales, W=Sales Host, M=SimpleCharge, etc.). Verify that the appropriate check boxes are checked for each salespoint based on the licensing that was purchased. If you are unclear as to what any of the check boxes stand for, hover the mouse pointer over the three-letter column name for a complete description or consult the Salesware Modules, Licensing and Maintenance document.
Note: On Windows Server 2008 (32- and 64-bit), you need to turn on DEP, and then exclude Sales after it is installed. See
Installing with an “execution protection” capable processor for how this is done.
To run the Sales installer:
1. Ensure that Common Files application is already installed.
2. If you are installing Sales on the server computer where Server Files application is already installed, you can run the Install_Siriusware_Sales_43xx.msi installer directly from the Siriusware\Install directory. If you are accessing the Siriusware\Install directory over the network, you can either run the installer over the network or copy the installer to the desktop and run it from there. Siriusware Inc. recommends that you run the installer over the network. If you later modify the installation, Windows looks for the installer in the location from which it was originally run. It might inadvertently get deleted from the desktop.
3. You are presented with the following dialog. Click Next.
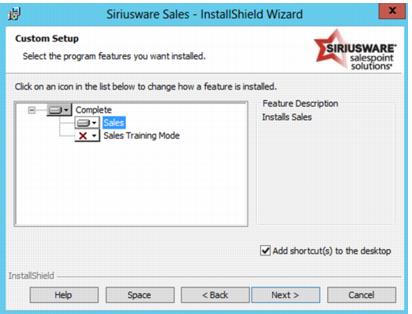
4. You are presented with the following dialog. You can add the training mode Sales, but you are required to install a training database before you can use it (see
Installing a training database). You can select either
This feature will be installed on local hard drive or
This feature, and all subfeatures, will be installed on local hard drive. The two options are equivalent. Click
Next.
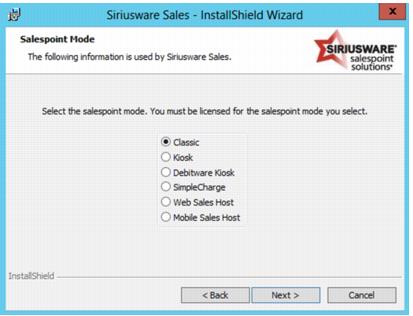
5. You are presented with the following dialog. Select which type of salespoint this is: Classic, Kiosk, Debitware Kiosk, SimpleCharge or Web Sales Host or Mobile Sales Host. Based on your selection here, you are later presented with a list of only the applicable salespoints when choosing the name for this salespoint.
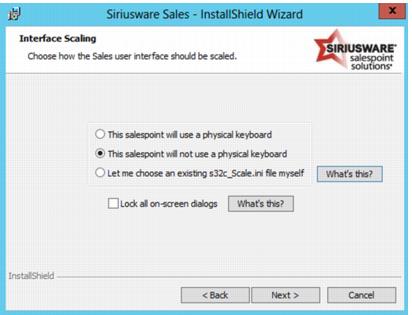
6. You are presented with the following dialog. Select whether or not this salespoint will utilize a physical keyboard. The Sales installer will install an appropriate s32c_Scale.ini file depending on which option is selected. The s32c_Scale.ini file specifies how the various dialogs in the Sales interface will be scaled and positioned. If you specify that this salespoint will not use a physical keyboard, the Sales interface will include an on-screen keyboard where necessary, and will be scaled appropriately. If you would like Sales to use a pre-existing custom s32c_Scale.ini file, select Let me choose an existing s32c_Scale.ini file myself.
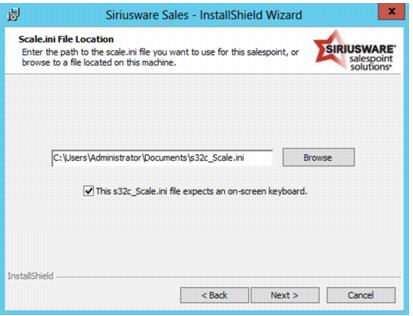
7. If Let me choose an existing s32c_Scale.ini file myself was selected on the previous dialog, you are presented with the following dialog. Click Browse to browse to the s32c_Scale.ini file located on your computer that you would like to use with Sales. During installation, a copy of this file will be made and placed into the appropriate directory. You may still specify whether Sales should include an on-screen keyboard. If this s32c_Scale.ini file expects an on-screen keyboard is selected, the Sales interface will include an on-screen keyboard, but the scaling and positioning of the Sales interface dialogs will not be modified.
8. You are presented with the following dialog. This dialog is populated using the SiteDefaults.INI file that was installed by Pool Service.
Note: In this example the CreditCardServer_IP setting has not yet been added to the SiteDefaults.INI file. Setting the Credit card server field on this dialog sets the IP address for this particular installation of Sales only: the credit card server IP address must be manually added to the SiteDefaults.INI file if you want the IP address to appear on this dialog for future installs of Sales. Click Next.
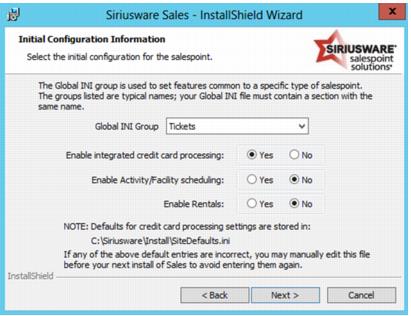
9. You are presented with the following dialog. The
Global ini group lists the default groups in the global
INI settings in the
SysManager >
Preferences >
Miscellaneous >
Global .INI tab. For a description of how this works, see the
Salesware .INI Settings Reference document, available from
http://www.siriusware.com/docs. The three radio buttons are set depending on whether you have a credit card server, the Private Instruction, Activity/Facility Scheduling or Rentals modules, respectively. It is easy to change any of the settings you selected on this dialog later by accessing the
Sales32c.INI file and modifying accordingly. For more information on the
.INI settings created by this dialog, see the
Salesware .INI Settings Reference document.
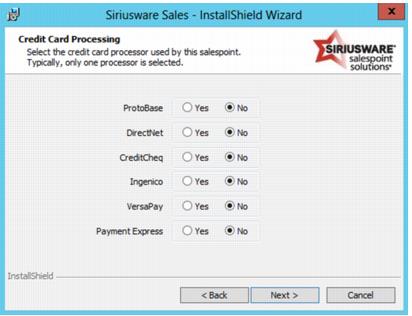
10. If you selected Enable integrated credit card processing on the previous dialog, you are presented with the following dialog. For more information on credit card installation, see Installing Charge Cards. Select the radio button for the type of integrated credit card processing that you are implementing. As a result of your selection, certain .INI settings are added to the Sales32c.INI file. For more information on the .INI settings created by this dialog, see the Salesware .INI Settings Reference document.
11. If you selected Ingenico credit card processing on the previous dialog, you are presented with the following dialog. As a result of your selection, certain .INI settings are added to the Sales32c.INI file. For more information on the .INI settings created by this dialog, see the Salesware .INI Settings Reference document.
12. You are presented with the following dialog. Click Next to start the Sales installation.
13. When the Sales installation completes, you are presented with the following dialog. Click Finish.